Pages

Make Google Chrome faster!

4 comments


However, such a feature seems not to work properly for a lot of users with the result that your Google Chrome will hang while downloading a website, returning you with this message: “Resolving Host”. Other times instead you may get a error message like this:
“The webpage at http://www.xyxyxyx.com might be temporarily down or it may have moved permanently to a new web address. Here are some suggestions: Reload this web page later.” Here is a simple Google Chrome Trick to solve this issue and get an ever faster surfing experience!
  1. Open Google Chrome.
  2. Click the Spanner icon located on the right side of the browser.


3.Click Options.
4.Click the Under the Hood tab.
5.In the Privacy section, untick Use DNS pre-fetching to improve page load performance.
6.Click the Close Button.
7.Restart Google Chrome


How to change language in Windows 7

0 comments

Some version of Windows 7, such as Windows 7 Ultimate and Windows 7 Enterprise, allows users to change the support language to display text in wizards, menus, help and supports and dialog boxes. Here is the manual procedure to change language in Windows 7.

1.Click the Start button.
2.Click Control Panel.
3.Under the Category view, click the Clock, Language, and Region link and right after that click Change Display Language link located under the “Region and Language” section.


4.Under Icon view, click Region and Language icon, and click the Keyboards and Languages tab.
5.Under the “Display Language” section, choose and change language from the drop-down menu.


6.Click Apply.
7.Restart your computer for the change to take effect.

If you want to change the language of the welcome screen, network services, local system. If you also wish to change the language of new user accounts, follow this other procedure:

1.Click the Administrative tab in the “Region and Language” window.
2.Under the “Welcome screen and new user accounts” section,

3.click the Copy settings button.
Now, in the “Welcome screen and new user accounts” dialog box, tick the Welcome screen and system accounts and New user accounts checkbox.


Enable Win’s User Account Control

0 comments

User Account Control (UAC) notifies you before changes are made to your computer that require administrator-level permission. The default UAC setting notifies you when programs try to make changes to your computer, but you can control how often you are notified by UAC by adjusting the settings.Like

Windows needs your permission to continue

A Windows function or program that can affect other users of this computer needs your permission to start. Make sure to ensure that it's a function or program you want to run.

A program needs your permission to continue

This will happen when a program that's not part of Windows needs your permission to start. It has a valid digital signature indicating its name and its publisher, which helps to ensure that the program is what it claims to be. Make sure that this is a program that you intended to run.

An unidentified program wants access to your computer

This is caused by a program that your administrator has specifically blocked from running on your computer is trying to run. To run this program, you must have an administrator unblock it.

The main reason to use UAC is to prevent malware and spyware from installing or making changes to your computer without your permission.

Here is how you turn the User Account Control feature off:

  • Open User Accounts from Control Panel.
  • Click on turn User Account Control on or off.
  • If You use Win7 then set the level of UAC else
  • Uncheck the box that says Use User Account Control (UAC) to help protect your computer.
  • Click Ok. You may have to enter administrator credentials depending on who you are logged in as.
  • Restart your computer for the changes to take effect.

Change the size of virtual memory

1 comments


If you receive warnings that your virtual memory is low, you'll need to increase the
minimum size of your paging file. Windows sets the initial minimum size of the paging
file equal to the amount of random access memory (RAM) installed on your computer plus
300 megabytes (MB), and the maximum size equal to three times the amount of RAM installed
on your computer. If you see warnings at these recommended levels, then increase the
minimum and maximum sizes.

1.Right Click to MyComputer>>properties.

2.In the left pane, click Advanced system settings. If you are prompted for an
administrator password or confirmation, type the password or provide confirmation.

3.On the Advanced tab, under Performance, click Settings.

4.Click the Advanced tab, and then, under Virtual memory, click Change.

5.Clear the Automatically manage paging file size for all drives check box.

6.Under Drive [Volume Label], click the drive that contains the paging file you want to
change.


INTERNET ERROR CODES

0 comments

Some time when you search some matter or website then a error message come with code like above picture,What do all those error code mean ?
Means of error code given below...

400 – Bad Request – You probably typed in a URL wrong, the server has no clue what you’re looking for, or you aren’t allowed to have access. Usually, it’s a matter of the URL being typing in wrong. Maybe you mixed upper and lowercase letters or something.

401 – Unauthorized Request – you tried to get to something on the web server you’re not allowed to play with. In other words, you ain’t on the party list.

403 – Forbidden – You can’t access the page. You may not have access (it may require a password), or it may be blocked from your domain.

404 – Not Found – The page you were trying to look at was not found on the server. This is probably the most common error you’ll come across. What has probably happened is that the web page you were going to has been removed or re-named.

500 – Internal error – Usually caused by a CGI error. You fill out a form, but the script used to process it is not working properly.

503 – Service Unavailable – The server may be overloaded, down, or have other similar problems. Try later.

Set the manual proxy settings on your browser

0 comments

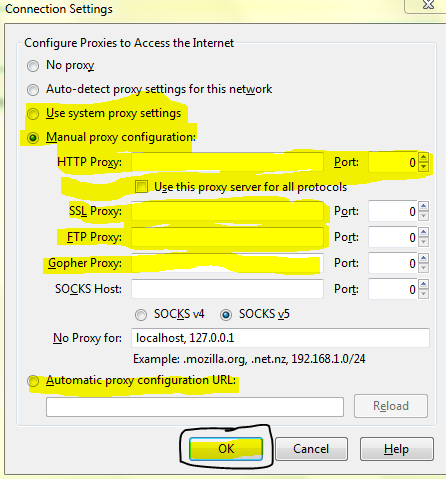
Here i am tell you how to set manual settings of proxy for your Mozila Firefox browser.First open your Mozila Browser and look in the upper left corner given a object Tool...


Click on the Tool,you see a list in which given many function click on the 'option'.After that you see a new window like given below...


Go to 'Advance' and after than 'Settings'.Than open a new window like given below..


Set Manually and Enter the proxy site name which you like for use.

Web Surfing Proxy

1 comments

What is a proxy?
A proxy is an address of a proxy server that is placed between your computer and the internet :
Normal :
Computer --------> Internet

With proxy :
Computer ---------> Proxy server -----------> Internet


The advantage of a proxy is that if you hack the would get your ip address but the address of the proxy server. Same if ur a normal internet user the hacker won't get ur ip but the ip of the proxy server.

Kind of Proxies:
Private proxies : They are only for you (it's the same like buy your own ip address ) and will cost 15-20$
Public Proxies : They are for everyone but the problem is sometimes you can get fast proxy's and sometimes slow ones. If you have a good site/list with fast proxy's there as good as private proxy's

Proxy software:
Use the proxy software,for download click below..
Here

For free proxy use the proxy website like www.proxy.org,www.proxyforfree.org etc.

Top 50 Companies In Hardware Industry-2010

0 comments


# company

1 Samsung
2 HP
3 Foxconn
4 LG Electronics
5 Nokia
6 Toshiba
7 Dell
8 Intel
9 Apple
10 Cisco
11 Quanta Compute
12 Fujitsu
13 Canon
14 Ricoh
15 Asus
16 Acer
17 Compal Elect.
18 IBM
19 Lenovo
20 NEC
21 Alcatel-Lucent
22 Sony
23 Hitachi
24 Motorola
25 Wistron
26 Flextronics
27 RIM
28 Sharp Corporation
29 Inventec
30 Nintendo
31 Seagate Technology
32 Ericsson
33 Pegatron
34 Sony Ericsson
35 Epson
36 TSMC
37 AU Optronics
38 Western Digital
39 ZTE
40 Qualcomm
41 Nokia Siemens Networks
42 Huawei
43 Hynix
44 Xerox
45 Micron Technology
46 Microsoft
47 NTT DoCoMo
48 Sun Microsystems
49 AMD
50 Jabil Circuit

How block unwanted email on gmail,yahoo and hotmail

4 comments


For Gmail:

1. Login to your account

2. At the top-right corner, click on Settings

3. Under Settings, click on Filters

4. You’ll now see an option “Create a new filter“, click on it

5. Now in the From field enter the email address from which you do not want to receive the emails

For ex. you may enter john@gmail .com in the From field to block all incoming emails from this address. However if you want to block the whole domain then use the following syntax: *@xyz.com. Now all the incoming emails from the domain xyz.com will be blocked.

6. Click on Next Step, select the action you’d like to take on the blocked emails. You may select the option Delete it so that the blocked email is moved to trash. To unblock the email, all you need to do is just delete the filter that you’ve created.


For Yahoo:

1. Login to your account

2. At the top-right corner, click on Options

3. A drop down menu appears, now click on More options

4. In the left panel select the option Filters and click on create or edit filters

5. Now click on Add

6. In the next screen, give a name to your filter and in the From header field enter the
email address that you want to block.

Fox ex. john@gmail.com or if you want to block an entire domain then just enter
@xyz.com. Dont enter *@xyz.com. Select the option Move the message
to: Trash and click on Save Changes.


For Hotmail

1. Login to your account

2. At the top-right corner, click on Options

3. A drop down menu appears, now click on More options

4. Click on Safe and blocked senders link under Junk e-mail

5. Now click on Blocked senders

6. Type in the email address that you want to block under blocked e-mail
address or domain field.

For ex. Enter john@yahoo.com to block the individual email address or
just enter xyz.com to block the entire domain.

That’s it. You no longer receive those annoying emails in your inbox. Keep your inbox clean and tidy. I hope this post helps.

-AJAI SINGH

How To Sign Out of Gmail Account Remotely

2 comments

Gmail is one of the widely use email service.There are lot of features in gmail.There is a security feature for gmail known as remote logout. Many of use more than one computers to login to gmail account. Some times we often leave the browser opened & not being logged out of gmail or we are in cyber cafe and any power cut or computer faliure occurs and if the computer is at office or any public place your account may be hacked or misused by someone else.But there is a method by which you can log out from your gmail account remotely.Open you gmail account and go to bottom of the page ,there you will see something as shown below..


Now you can click on “Details” which shows you a pop-up having details about your last sessions.Click on “Sign out all other sessions” to sign out of gmail at all other places exept the current.By this simple feature you can check that your gmail account is hacked or not.

-AJAI SINGH

Related Posts Plugin for WordPress, Blogger...

Hackarde's Search Engine- Search Hacking Tutorial,Tool and eBook

Loading
 
HACKARDE © 2011 | Designed by HrDe