Pages

How to Install Backtrack in System

14 comments

I think you would know that all Hacker is the FAN of "Linux OS" So i am going to start a series of "Backtrack Linux" hacking tricks and add  new post in series time to time.I hopes u like my this series as like as all tricks.


BackTrack is relatively simple to install. We will run BackTrack by booting it as a Live DVD and then install it on the hard drive.

Perform the following instructions step-by-step:

 1.    Burn the BackTrack ISO (we are using the BackTrack 5 KDE 32-Bit edition) that you  have downloaded into a bootable DVD.

 2.    Boot the laptop with this DVD and select the option BackTrack Text – Default Boot Text Mode from the boot menu:


3.   If booting was successful then you should see the familiar BackTrack screen:
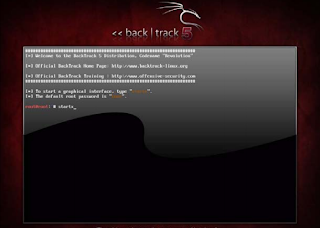


4.   You can boot into the graphical mode by entering startx on the command prompt.  Enjoy the boot music! Once you are in the GUI, your screen should resemble the following:


5.   Now click on the Install BackTrack icon to the top-left of the desktop. This will  launch the BackTrack installer as shown next:


 6.     This installer is similar to the GUI-based installers of most Linux systems and should  be simple to follow. Select the appropriate options in each screen and start the installation process. Once the installation is done, restart the machine as prompted, and remove the DVD.

 7.    Once the machine restarts, it will present you with a login screen. Type in the login as "root" and password as "toor". You should now be logged into your installed  version of BackTrack. Congratulations!


Immediately Hide Your Desktop Work By See Anyother

1 comments


This is my favorite way of hiding things from others, and the great thing is that Virtual Desktop Managers can also be used to actually get some work done. Virtual Desktop Managers are programs that allow you to have multiple desktops within your own desktop, making it easier to work on separate projects.
For example, you could have games on one desktop, blogs on another, and whatever you’re working on on the third desktop. It’s really a handy way of organizing your desktop. The best thing about it is that you can use most Virtual Desktop Managers to hide your active windows from those prying eyes.

For You i m going to making 3 Desktop where 2 virtual and One Real.

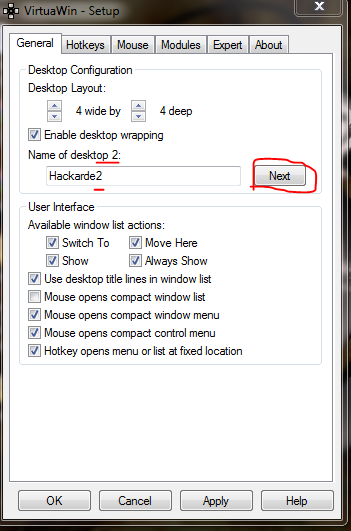
When you open your VDM then it look like below pic,feel up like below pic...


Click "Next" and make new again ....


As well as Hackarde3....


When you click "Apply" and Ok then on desktop left side in bottom you see icon like below pic...


Click Right Key on them and select your Desktop.


Trojan Attack

7 comments

Today my post based on ProRat Trojan by which you hack another person computer and also control him by your PC.On market many Trojan present but i like ProRat for hack because it also provide RAT service.

So let's go.

Open up the program then you see like below pic window...


Click on the "Create" button and choose "Create ProRat Server".

On IP Address fill the your System IP address or click on turn arrow button,it find automatically.Enter your email ID address because when victim system infected then it send you message on your account.


Click on "General Settings" and set Port Password and Name of victim.


Click on the Bind with File button to continue. Here you will have the option to bind the trojan server file with another file. Remember a trojan can only be executed if a human runs it. So by binding it with a legitimate file like a text document or a game, the chances of someone clicking it go up. Check the bind option and select a file to bind it to. A good suggestion is a picture or an ordinary text document because that is a small file and its easier to send to the people you need.


Click on the Server Extensions button to continue. Here you choose what kind of server file to generate. I prefer using .exe files, because it is cryptable and has icon support, but exe looks suspicious so it would be smart to change it.


Click on Server Icon to continue. Here you will choose an icon for your server file to have. The icons help mask what the file actually is. For my example I will choose the regular text document icon since my file is a text document.


 After this, press Create server, your server will be in the same folder as ProRat. A new file with name "binded_server" will be created. Rename this file to something describing the picture. A hacker could also put it up as a torrent pretending it is something else, like the latest game that just came out so he could get people to download it.

Very important: Do not open the "binded_server" file on your system.

You can send this trojan server via email, pendrive or if you have physical access to the system, go and run the file. You can not send this file via email as "server.exe", because it will be detected as trojan or virus. Password protect this file with ZIP and then email it. Once your victim download this ZIP file, ask him to unlock it using ZIP password. When the victim will double click on the file, he will be in your control.

Once the victim runs the server on his computer, the trojan will be installed onto his computer in the background. The hacker would then get a message telling him that the victim was infected. He would then connect to his computer by typing in his IP address, port and clicking Connect. He will be asked for the password that he made when he created the server. Once he types it in, he will be connected to the victims computer and have full control over it.


Now the hacker has a lot of options to choose from as you can see on the right. He has access to all victim's computer files, he can shut down his pc, get all the saved passwords off his computer, send a message to his computer, format his whole hard drive, take a screen shot of his computer, and so much more. Below show you a few examples.


The image below shows the message that the victim would get on his screen if the hacker chose to message him.


Below is an image of what the hacker would see if he chose to take a screen shot of the victims screen.


FOR DOWNLOAD PRORAT CLICK HERE

Password "pro"

How Make YouTube Too Interesting -1

1 comments


My first Post of Feb is based on YouTube.Today all person use YouTube for watch some knowledge,interesting video.I am going tell you how you make your experience too good with YouTube.So let's start.


How Download YouTube Video As MP3:


For this copy URL of UTube video and paste in the www.listentoyoutube.com


How Edit Video On UTube:


For this go to www.youtube.com/editor


Download YouTube Videos in HD Format:


Go Here  http://members.home.nl/wantos/youtube_hd_transfer/


How to watch two YouTube videos side by side:


Click Here  www.youtubedoubler.com 


Convert YouTube videos to ringtones:


Go here   www.video2ringtone.com


Remove Malicious BHO's from your system

2 comments


SpyBHORemover (formerly BHORemover) is the advanced tool to explore and remove Malicious BHO's from your system. 

BHO stands for 'Browser Helper Objects' which are plugins written for 'Internet Explorer' to enhance its capabilities. Often this feature is being misused by many spyware programs to monitor user's browsing habits and to steal the users credentials silently. Also some of the BHO's slow down the system considerably.
SpyBHORemover helps in quick identification and removal of such spy BHO's present in the system. It not only performs heuristic based threat analysis but also provides Online Threat Verification mechanism which makes it easy to differentiate between legitimate and malicious BHOs. 

It also presents 'Backup & Restore' feature which makes it easy to remove and re-install the BHO any number of times. Users no longer have to worry about accidental removal of BHO as all removed BHOs are automatically backed up which can then be restored from 'Removed BHO List'. It also comes with a unique feature to completely enable/disable all installed BHOs at one shot.

It works on wide range of platforms starting from Windows XP to latest operating system, Windows 7.


Here are the highlights of some of the salient features of SpyBHORemover which makes it special.
Automatically scan & analyze all installed and previously removed BHOs instantly.

'Advanced Threat Analysis' for each installed BHO using the built-in heuristic mechanism.

Color based threat representation for quick identification and separation of BHOs based on various threat levels.

New 'Backup & Restore' feature enables user to remove and re-install BHO as many times without any worries.

Shows all running processes having the selected BHO DLL and provides option to Kill the process or Remove the DLL from such process.

Unique feature to completely enable/disable ALL installed BHOs for the current user at one shot.

'Online Threat Verification' of malicious BHO using any of the following popular online portals.

VirusTotal (www.VirusTotal.com)
ThreatExpert (www.ThreatExpert.com)
ProcessLibrary (www.ProcessLibrary.com)

One click BHO removal option to remove the selected BHO instantly.

ight click menu option for all the lists for quickly execution desired action.

View detailed properties of selected BHO DLL through double click or right click menu options.

Quickly jump to corresponding BHO location in Registry using Regedit tool for selected BHO.

Export the complete BHO scan report along with threat analysis information to standard HTML format for offline analysis.

Displays detailed information for each installed BHO

BHO Class Name
Threat Analysis Information
Company
Product Name
Install Date
CLSID of the BHO
BHO File Path

Enriched GUI interface with user friendly options and cool buttons.

Sort feature to arrange the displayed BHO's based on various parameters such as BHO name/threat level/company/product name/date/clsid/dll path.

Does not require any installation as it is standalone portable tool and can be run directly on any system


For Download this Tool and More Info Click Here

Remove Google Redirect Virus from your system

3 comments


If your Google search result redirect to any weird,obnoxious or otherwise any porn site that means your system infected with GRV means Google Redirect Virus.GRV is a Trojen 

It does not matter with which link you click or which browser use by you.

Somebody thought this is the problem of Google but in reality it is add with your system,so in your mind a question come how to remove it.Here i am going tell you how to remove GRV from your system.


First Download TDSKiller ,do not worry it is a Kaspersky Lab Tool and download direct from Kaspersky site.

After download open it,it look like below pic...


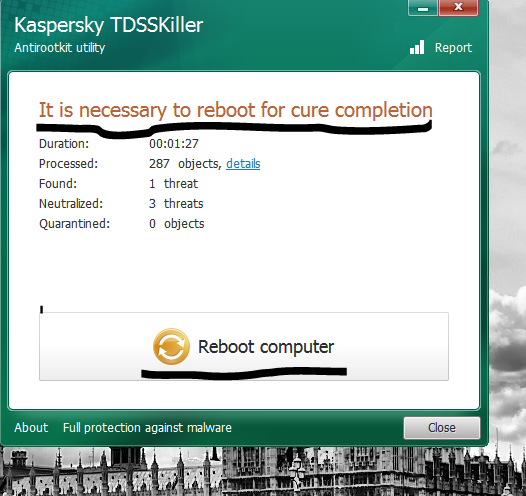
Click on Start Scan and after scan you see result like below pic,Here you found option Skip or Delete for infected program.


After Delete the infected program please Reboot your system.


If your TDS Tool fail in removing the infected file then in that case use the TDS FixTool , you also download this file from www.symantec.com.After download run it,you see box like below pic,Proceed it.


When you Proceed then it restart your system and after that doing scan like below pic...


And last shown the result like below pic....


Use Crypter in place of Binder for make your Keylogger Undetectable

9 comments


The main purpose of a Binder is...

Binder is a software basically used for combine the two or more files in one
 file under only one name and extension.


You makes your Keylogger and want send it to your victim but his Antivirus detect the Keylogger which bind with other file and remove it.I think this problem come in front of everyone so how to solve it?

I am used a Crypter in place of Binder,what is the means of Crypter?

It is a software that can encrypt executable (.exe) files. crypters are popularly used to encrypt viruses, RAT’s, keyloggers, spywares etc. to make them undetectable from antivirus.

Crypter use the original binary code of .exe file and apply many encryption on them and The End Of File(EOF) a new Executable file created which not detected by Antivirus.


Mainly when a new Crypter launch in market and it's also free so its detect by antivirus making company and it make program against it,So every Crypter out dated after some time.

Here i am given you Chrome Crypter v2 which work for me without any problem.So download it.


Password of zip file is "www.hackarde.com"

Bind a File with Your MP3 Music File

4 comments


1. Choose 'container' mp3 by clicking 'Select source mp3' button
- You may check maximum hidden data size that previously selected mp3 can handle 
by clicking 'Max. Hidden Size'
- You may check selected mp3 info by clicking 'Get mp3 info'
2. Choose a file you want to hide by clicking 'Select Hidden File'
- You may check file size after encryption and compression by clicking 'Size after 
encrypt+compress'
3. Type your password in the provided textbox. Do not forget this password since this 
application have no input for confirmation password.


4. Click 'Hide It!' to begin hiding data. Please be patient since the algorithm is not
optimized, so, the application maybe look not responding.
5. For example, if your source mp3 is 'one.mp3', the stegged-mp3 result will have file
name 'one.mp3-steg.mp3' located in the same folder as 'one.mp3'


==============To reveal/get hidden file inside mp3===========
1. type your password in the textbox provided. Wrong password will cause damaged
result file.
2. Choose stegged-mp3 file by clicking 'Select Stegged-mp3'.
3. Click 'Reveal!' to begin revealing hidden file.
4. For example, if your stegged-mp3 file is 'one.mp3-steg.mp3' and you hidden data is
'.jpg' file, result file will have file name 'one.mp3-steg.mp3.jpg' located in the same
folder as 'one.mp3-steg.mp3'.


Hack Facebook Account by Emissary

15 comments


My this post help you hack your Victim Facebook Account ID & password like my old post on Gmail account hack http://www.hackarde.com/2012/01/hack-gmail-account-of-your-victim.html .

Before start first confirm that in your system .Net Framework are Installed or not,if not so download it.


Run ‘Emissary.exe’ file and enter your gmail account details,  so that the password and other info of your victim can be mailed to you.I am given advice you use a fake Gmail Account for this.


In Server Name write the server.exe and set interval according to you.

In Fake Error Message write Error Tittle and also Message, because it's display when Victim click on Malicious File.


You also change some settings like...


Block AV Sites: Blocks for the VirusScanning Websites on target computer
Add to Startup: Adds to Startup via Registry
Antis: Anubis, BitDefender, Kaspersky, Keyscrambler, Malwarebytes, NOD32, Norman, Ollydbg, Outpost, Wireshark
Disable TaskManager: Disable TaskManager on target PC
Disable Regedit: Disable’s  the Regedit on target PC.


And Last click on Build Button when you do it then a file build in same folder,send this file to victim.
Because this is a free keylogger, you can’t send server.exe file via email. Almost all email domains have security policy which does not allow sending .exe files. So to do this you need to compress the file with WinRar or upload it to Free File Storage Domains, like Mediafire, rapidshare, filethief etc.


Once the victim runs your sent keylogger file on his computer, it searches for all the stored usernames and passwords and it will send you email containing all keylogs and screenshots regularly after the specified ‘Time interval’.

Create Your Own Virtual Private Network

3 comments


My today post help you make your own Virtual Private Network (VPN) by which you share your Files,Music and Video and also play the Online Game. 

We uses the HAMACHI who help us make the server and also add the client of your VPN.So first Download the HAMACHI...


So after download and installation of Hamachi follow the below step....


Your Hamachi login window like below pic,click on Power On button like below pic...


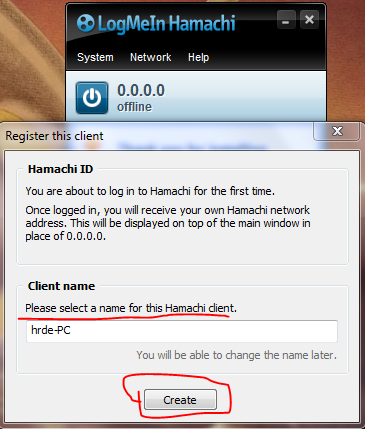
When you done Power On then a window Pop-Up like below pic,here write your name and click on Create.


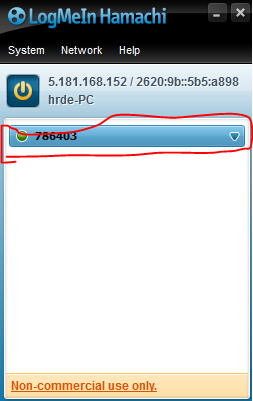
Hamachi show you,your address with name like below pic,Here click on Create a new Network like me...


Again a new window Pop-Up which ask Network ID and Password fill both according to you,but always mind it...


After some seconds your VPN ready like below pic...


Call to your friend and say open his Hamachi and click on Network like below pic and also in under Network click on  Join a Existing Network, when he done it then a window pop-up on his screen like below pic...


Tell the Network ID and Password of your VPN to your friend and when it enter like below pic,then say him click on Join button. 


When your friend done it then you and your friend connect with a VPN on Internet ,you also connect multiple friend on your VPN by this trick.


ENJOY!!!!!!!!!!!


If you like this post so plz given your good comment below.

Related Posts Plugin for WordPress, Blogger...

Hackarde's Search Engine- Search Hacking Tutorial,Tool and eBook

Loading
 
HACKARDE © 2011 | Designed by HrDe