Pages

Google Music Goes Public

0 comments

Ya is right Google finally launch his music service "GoogleMusic" for public use but only in america.The feature of Google Music given below...


Discover.

Find music you love. Check out Android Market for staff-picked rising artists and great bands from your favorite genres. Meanwhile, Google Music works seamlessly with Android Market to offer personalized recommendations based on what you listen to most. And when you're not shopping for new music, rediscover your own library by creating an Instant Mix.


Shop.

Buy now, listen now, sync never. There are hundreds of free songs and millions more to buy on Android Market. The music you choose is automatically stored in your Google Music library and instantly ready to play or download.


Listen.

Access your Google Music library anywhere and anytime - no syncing, no wires. Stream music instantly on the web and listen on your Android phone or tablet with the Google Music app. Not online? No problem. Just save your favorites to your mobile device for offline playback.


Organize.

Keep all your music in one place. Anything you get from Android Market is automatically stored in your Google Music library and you can add up to 20,000 of your own songs -- all for free. With your music saved online, you have even more space for all the other things you love.


Share.

Sharing is caring. For songs purchased from Android Market, you can share a listen with your friends on Google+.


Want Something Like This

1 comments

Hey viewer this post make your browsing experience too good and wonderful if you see below picture.

Your Google page like this...


Your YouTube page like this...


Your Facebook Login Page look like below pic...


And your FB page like below pic...

And make more wonderful compare to given picture.HOW?

First Install Stylish

And then a new ICON come into your Browser Boader and then click on and try different Theme.

Let's Enjoy!!!!!!!!!!

Make Gmail Account Without SMS Verification

0 comments

Today thread tell you about Gmail email service hack by which you make a new Gmail account without SMS verification code.

When you make your new Gmail account then Gmail ask your Mobile number for send a verification code on your mobile by SMS,without this code you can never make your account on Gmail.My today trick helpful for you discard this step in way of making new Gmail account.


Concept: Concept here is only this you make a new account by unique name and password which never exits in Data Base of Gmail.You also make your account by proxy.

  1. Enter username which are unique itself,remember first and last username different and totally unique and it is not a number.
  2. For unique name watch and look any movie and take help of any movie tailor.
  3. For login name also use different name and remember it is never a number.
  4. Your Password unique and never use any number.
  5. Choose your own security question which unique and also answer.
  6. Do not enter recovery email address.
  7. The rest is at your choice.

If you want again make a account by same name then it does not exits without verification,I am make my account by "IMDBAAA@gmail.com" name without verification.

So Enjoy it!!!!

One Boot CD For Install All Linux Version

0 comments

When you want to install a new version of any Linux operating system then always you Burn a new CD for Installation.Today i am going intro to a new trick who very help full for you.By this trick you only use one CD for install new version or update of

  • Ubuntu
  • Debian GNU/Linux
  • Fedora
  • OpenSUSE
  • Mandriva Linux
  • Scientific Linux
  • CentOS
  • Slackware
First Download Software From HERE

Note : Internet Connection must for this trick (Internet By Ethernet Cable,Wireless does not work)

After download it Burn ISO file in a CD.

After Burn CD enter the CD in drive and run it when you run this then you see a screen like below pic here first choose "download" option for new and update version after it choose "install" option...


After all above work done you see a new screen where all Operating System name given like below pic,i am choose "ubuntu" Linux operating system and click OK...


When you click OK then all version of Ubuntu you found like below pic and choose your version and done OK...


You successfully Install your Linux Operating System but remember you use ethernet cable Internet.


So Enjoy it and also save time and money.

[Winner] Hackarde 2nd Contest Winner Announcement

0 comments

Announcement Of HACKARDE 2nd Contest Winner


Some days before i am announce a contest on anniversary of My blog Hackarde. I am found good response and it good for my all viewer.The prize of 2nd Contest is the book of G8t Wireless penetration tester Vivek Ramachandran which name is Backtrack 5 wireless penetration testing.

Today according to my promise i am going to announce the Winner name of Hackarde 2nd contest.So the name is

1st winner
Krishne kant

2nd winner
Niketan Gupta

3rd winner
Ivan Chin

I am request to my Winner plz send his Confirmation Email by his registered Email ID to me and after confirmation i am send your copy.

Nmap - Secure Your Wi-Fi network

0 comments

My Today post for those person who use his personal wi-fi network for home/office/organization and other work.Nmap is a tool who also know by Zenmap. Nmap mainly a port scanner who helpful in secure and enhance your security of your wi-fi .

For security mainly all person use AntiVirus who not complete package of security for your personal network.Nmap a way by which you scan your network devices for example some time your network speed slow down for particular device because a virus make it difficult for you.

All personal network devices use a private IP address for work in range of

172.16.0.0 --- 172.31.255.255

192.168.0.0 --- 192.168.255.255

You Target the IP address of devices for scan in network.

For Download Nmap for Different Operating System Click HERE

Below You see the view of Nmap.In "Target Space" enter your Private IP of target device and In "Profile Space" enter level of Scan and Done SCAN.


If you do not idea about your Private IP address which use in your network so for it go to Your Router Admin Panel and set the Range by which in your setting range DHCP allot Private IP for all connected Device.For help look below pic...


For Scan Target enter the IP address of your target device in Set Range of IP and done Scan.


It show you all open port in your network,sometime virus open a port it also trace it and show you like below pic.If you want Trace a range then enter CISDR of want Range like

192.168.1.1/24


Port/Hosts show you all active port in one place like below pic...


And Topology given complete view of your network topology.


In this post many world related with Networking so plz search those world on Search Portal and by Wikipedia.

Trace Your Friend and Family Member Location By His Phone

0 comments

Today thread Topic name is too interesting because it helpful for you trace the current geographical location of your lie friend,partner and child.

This trick work only with iPhone/iPod and Android OS based mobile phone.

Go to Here and Make free account.

After making free account see below side of webpage you look like given below...


Here Choose your gadgets iPhone/iPod or Android by click the option.

You see a page like below pic where you click on "click here" option which show by under red line in below pic...


This link open a web page where free downloading of software given,but i am given direct link for you..


Install this Software on your Friend and Family Member Phone.

After installation of SW plz sign in on Your account which you already make before and go to "SEARCH" option like below pic after sign in.

Here enter your victim number and it given you trace current location of Phone which use by your victim.


You also use this service by your phone with sign in your account.When you use phone for trace location then it look like below pics...


This work only in America.

So Enjoy it!!!!!!!!!!!!!!!

Send Free Faxes From Your Android Phone

0 comments

Need to send a fax, but don't have a fax machine? No problem! Every paid FilesAnywhere account is able to send outbound faxes. It's simple, efficient, secure, and free! If you wish to view a video tutorial on sending a fax, click here.

By use of this trick you also capable to send Fax by your android application,for this go to HERE and install Android application.And then make your free account HERE.

With FilesAnywhere, you can view, share and manage your remote files directly from your phone. Upload your photos and contacts or manage, share, email and fax files wherever you go!

New users can Sign-up for a free 1000 MB account directly from the application Send faxes directly from your app to any fax number, worldwide.

Let's Get Started:

1. Login to FilesAnywhere by your android phone.

2. Select the Send/Share tab from the tool bar like below pic...


3. Click the SendFax option in the Sharing Options screen.


4. Use the Browse Files button to select files, or use the folder tree to select the document. Click Add Selected.


5. Fill in the appropriate fields within the Recipient, Senders Details, and Cover Page tabs.


6. Click the Send Fax button.


7. A prompt then lets you know your fax is being sent, and you'll receive an email with confirmation of your fax status.

8. To view the Fax History log, reopen the Send/Share menu and click the Fax History link on the Send Fax button.


9. The Fax History Log will display a list of all sent and received faxes.


Important Information About Faxing with Your FilesAnywhere Account:

  • Free accounts are allowed a maximum of 10 outbound faxes a month.
  • Web Basic and Web Advanced plans are allowed up to 500 outbound domestic faxes, or 100 outbound international faxes per month

Your Android Mobile Screen look like below pic...


Enjoy!!!!!!!!!!!!!!!!

Gmail Motion

0 comments


Upcoming feature of Gmail "A new way to communicate "


Recover Windows Deleted Data

1 comments

This post tell you about recover your deleted data from your system memory successfully.It is very help full in case of you delete some data by mistake.

First download Tool from HERE
How To Use This Tool ?

After installation when you open this software then it shown like below window,here click next button.


After it you see below window where some option given for direct recovery but if your want not present in list then click "other" and Next...


Here choose "In a specific location" and Browse Folder which you want recover like below pic...


In next window check mark "Enable Deep Scan" and press Start like below pic...


Process start like below pic...


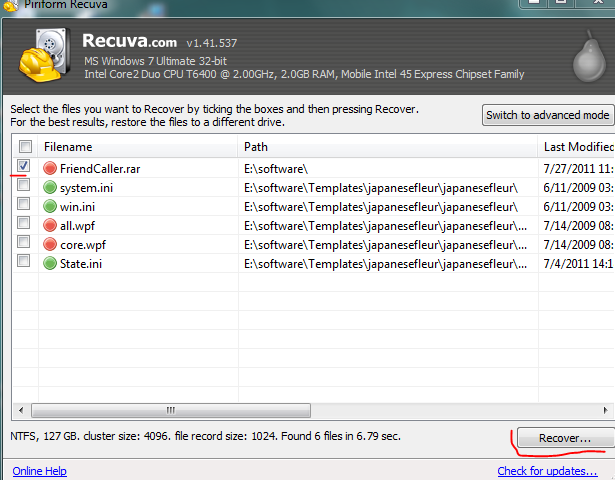
After all of this it given you file name like below pic,here choose your file and click "Recover" button...


When you press the Recover button it ask you "Select location for recovery" where you choose your folder where you want save recover file.You also make new folder like below pic..


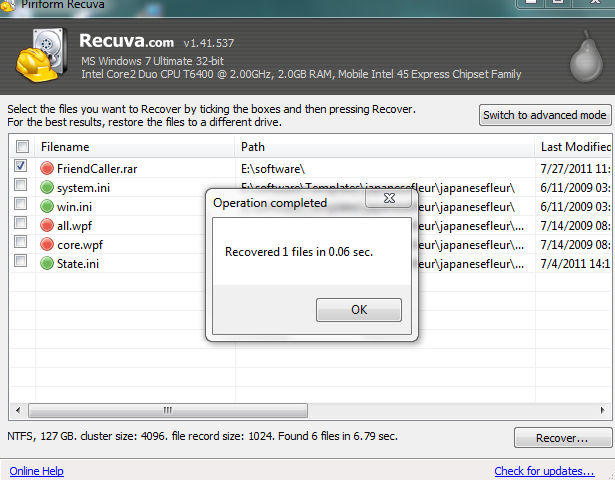
When successfully process done then a window pop-up like below pic...


Go to your folder who make or select by you for save recover data or file.

Related Posts Plugin for WordPress, Blogger...

Hackarde's Search Engine- Search Hacking Tutorial,Tool and eBook

Loading
 
HACKARDE © 2011 | Designed by HrDe