Pages

How to Hack FaceBook,Gmail and yahoo ID by Backtrack Phishing?

21 comments

Hello guys ! Long time before i wrote a tutorial on same topic http://www.hackarde.com/2012/03/hack-facebookgmailyahoo-and-twitter.html which like by mostly people but some visitor mail me and said it was not working for that. I made a promise to C'DUDE for make a new tutorial on same topic so now according to my promise i am come again with new trick.

First open your Backtrack Terminal and run command "ifconfig" for know your IP address like below picture, here my IP address is 192.168.0.13 , see...


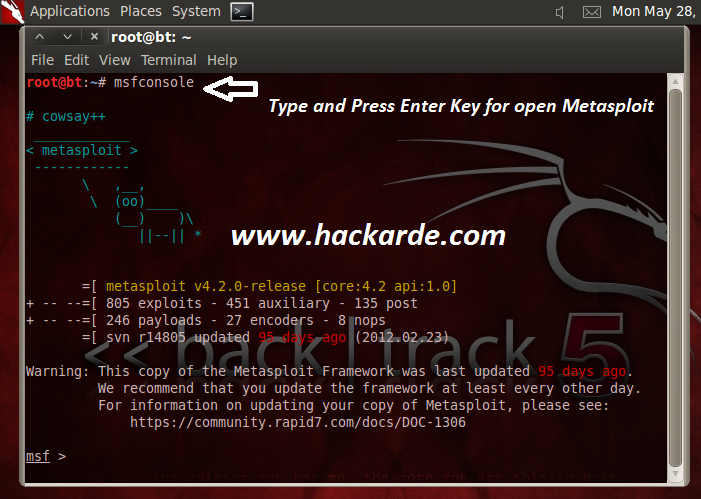
Step 1: Now Run two command for open Social Engineer Toolkit (SET) .

cd  /pentest/exploits/set

./set

see below picture for example...


Step 2: Enter your choice : 2 for choose "Website Attack Vector" , see below picture...


Step 3: Now after step 2 Enter your choice: 6 for select "Web Jacking Attack Method" , see picture...


Step 4: Now Enter Choice: 2 for "Site Cloner" , see picture...


Step 5: Now Magic Step here you enter URL of that site which login page you want use as Phishing page, in my case i am going to write http://www.facebook.com . You can also write for gmail , twitter and yahoo. See below pic for live example...


Step 6: When step 5 done then it ask for forward processing by say Press{return} to continue. So write return and then click on ENTER key, see pic...


Step 7: Now Send your IP address to victim by mail or Chat Room and say open this with your browser , You can also use Google URL shortner for change IP into URL , see my old tutorial http://www.hackarde.com/2012/03/hack-facebookgmailyahoo-and-twitter.html

Step 8: After work of step 7 when victim see IP page then they found a link who's say..

The site http://login.facebook.com/login.php has moved. click here to go to the new location 

See below pic...


Step 9: Now when victim click on above write link then you see some lines start come on your terminal window like below pic, means now you connect to your victim System...


Step 10 : 0n Victim site Facebook Phishing page open like below pic, now victim enter his ID and Password ....


Step 11: When victim login button press then this phishing page transfer his ID and Password to your terminal , see live example in below pic...


Now you have successful!!!!!!!!


I spend a lot of time for make Amazing tutorial for you , can you spend 1 minute for say thanks to me.

Plz Follow my site and encourage me for write more interesting post in future.


Also my blog www.hackarde.com

Thanks for visit.

How to collect Website Email Address

2 comments


Now i am going to tell you how to collect all email address of any site. So for this open your metasploit framework or go to Backtrack 5 terminal and type "msfconsole"  by which Metasploit open , see below picture....


Now run command "search gather" for see command "gather/search_email_collector" , see below pic..


Now run command "use gather/search_email_collector" , see below pic...


Now run "show options" for see option of this gather part of metasploit, see below picture...


Now We have ready for collect website Email address , so run command...

set domain yoursitename

In your+site+name write website name with domain which you want to collect email address, in my case i take example of yahoo.com so run command like below pic... 


Now domain set so run it by "run" command, see below pic...


Under some second or minute you got your Website Email address successfully.If you like my work done so follow my blog/ Facebook Profile/ Twitter Profile and encourage me by like my work.

Comment always Welcome!!!!!!!!!!

Anonymous With SSH Tunnel + TOR

4 comments


Hello Friends!! today i am come with one more tutorial. I thought you read my old post  Anonymous on Cyber Space  http://www.hackarde.com/2012/05/how-to-use-tor-in-windows-for-anonymous.html  today post enhance of my last post. Today i am going to teach you use TOR with SSH Tunnel and use it on your Website hacking activity.

First Download two tool from here and Install it :


After installation of putty open it and follow my step:

Step 1: Click on Session in putty ,and on Host Name write shellmix.com and also change Port into 30 select SSH and after all that click on OK , see below pic...


Step 2: When you done step 1 then a black window open and ask you about Login as: like below pic. This is the putty configuration window.


Step 3: Now on Login as : type newuser  and when ask password then again type newuser , see below picture...


Step 4: When you done step 3 then shellmix window look like below pic...


Now for make your new account on shellmix enter your login name like below picture. I have enter by site name hackarde see below pic...


Step 5: After enter your login name it's ask about Password of your account so write password which you want for your account, see below pic..


Step 6: Now it ask password for MySql database so type different password for forward working...


Step 7: Now it ask Choose Editor so enter Pico , see below pic...


Step 8: Now in next step it ask about your language, my second language is English in available list so going to enter US , see below pic...


Step 9: Now it ask about vHost so write shell and press Enter Key , see below pic...


Step 10: Now Select Hard Disk space for MySql DB , i choose hdd1 , see below pic...


When all 10 Steps done then it show your account fill information and ask for continue , then press Enter Key , see pic...


Step 11: Now Again open putty and under session enter Hostname shellmix.com  , port 22 and select SSH , but never click on open button , in place of this go to left panel and select SSH , see pic..


Step 12: Under SSH click on Tunnels see below pic and Enter Source port :9090 and click ADD with also select Dynamic then OPEN...


Step 13: When step 12 done by you then again Shellmix black window and ask for Login as: now here enter your account name and press ENTER key see below pic....


For enter under your account , it ask Password of your account now enter your password of old step then press ENTER Key , see pic...


Step 14: When you done step 13 then window look like below pic , now again press ENTER key and without close black window leave from here....


Step 15 : Now open your TOR browser and go to TOR Extension and select "Option" there , when you have done it then a window pop up on screen . There click on Advanced then Network then Settings and last a new small window pop up. Here select Manual Proxy Configuration and enter Host 127.0.0.1 with your putty port means 9090 and press OK button and restart TOR browser, see below pic...


Step 16 : Now your TOR browser connect with SSH tunnel , when TOR browser open then it show you your fake IP see below pic...


Now go to www.ip2location.com and see about your IP detail like below pic....


SetUp Tunnel With Skype :


Open your skype login Window and click on Tool from list select "Connection option" see below pic...


Now when connection window open then fill it according to below pic , and press save then open your Skype ID , now your Skype ID connect over SSH Tunnel. 


Use this with your hacking activities and always anonymous on Cyber Space.

IF you think my work helpful for you then follow my site and encourage me for future post.

Enjoy Guys!!!!!!!!!!!!


How to use TOR in Windows for Anonymous working

3 comments


Hello friends, me with my new tutorial. I know you think about why i have down in this month in write the new thread, so wanna tell you now this time i am busy with my project. Well now a g8t Anonymous Web Surfing post here, mostly i used this with SQL Injection attack.

When you use TOR then you connect with a network who's that totally anonymous and never trace by your ISP because it's show a lot of user connection with one request.


Now 1st click on download file for install, when installation done then a folder open like below pic...


Now enter in folder and click on Tor Browser Icon like below pic...


When you done work of last line then a window pop up and show you connecting to Tor , like below pic..


Now you connect to Tor Network Successfully see below pic...


After last step a Browser window open automatically and showing you,your fake IP address , see pic...


See my real IP , which totally different from my fake IP....


If you wanna change your Identity again on TOR network then click on "Use a New Identity" like below pic, and you see your identity changed....


I think you also like this thread, so enjoy!!!!!!!

Set Own Hacking Lab in Backtrack 5

6 comments


For Know more about hacking lab and also make own hacking lab in Windows OS read my old tutorial.....


Now today i am going to telling you how to setup Hacking Lab in Linux or Backtrack OS.

Open your terminal and run below write command...

cd /var/www

sudo -s

wget wget http://voxel.dl.sourceforge.net/project/dvwa/DVWA-1.0.7.zip


This command download Zip file of DVWA, see below pic for help...


For Unzip the DVWA file run below write command....

unzip DVWA-1.0.7.zip

See below pic for live example...


Now run below write command....

                                 cd /var/www/dvwa/config 
       nano config.inc.php

See below pic... 


When you have run above write command then terminal look like below pic...


Now here enter Username and Password, in my case i have used Root and MySql, see pic...


For start work run below command....

                                       service mysql start

                                     service apache2 start


See below pic..


Now open your browser and enter URL....

127.0.0.1/dvwa or localhost/dvwa

See below pic, now click on here , see pic...


Now your hacking lab page open, create Database by click on Create/Reset Database , see pic...


Now Your Lab start for work, use Admin:Password combination for login in Hack Lab.


Enjoy!!!!!!!!!!!!!

Related Posts Plugin for WordPress, Blogger...

Hackarde's Search Engine- Search Hacking Tutorial,Tool and eBook

Loading
 
HACKARDE © 2011 | Designed by HrDe