Pages

Showing posts with label System. Show all posts

Offline R00T Access in Linux

1 comments


Hello friend, today tutorial tell you how to root access in Linux. Use this thing when you forget your Linux password . It is possible but only then if there is no grub menu encrypted, if not we are able to have a root access. but WHAT IS GRUB MENU ?

GRUB or the GRand Unified Bootloader is the bootloader commonly installed by Linux distributions on your hard disk. GRUB is responsible for showing you the menu that allows you to choose the operating system you want to boot into and also lets you tweak and control the booting options.


First of we need to have access to grub menu.You may see it when u have different OS on one computer or at least a few kernels. For Example when you start your Backtrack then it's show you different kernal .

When you see grub menu timer, just stop it by narrow buttons (up or down button of keyboard), we have stopped grub menu timer, see below pic...


For play with root privileges press "e" key on your keyboard..and now we can see (boot) properties. Choose second line which starts from kernel /vmlinuz.....
Press "e" again and go to end of this statement.
Now press "space" and type:   

single linux

Now press Enter button and then press "b" key, Now you get Root Privileges which look like:


[root@computername] #

After that you may add new user by below command :

adduser r00t1

passwd t00r1

Change old user password by command : 

passwd olduser


Hope this work for you and also very useful. Enjoy!

Facebook >> http://www.facebook.com/pages/Hackarde/164165403639196?sk=wall

Twitter >> http://twitter.com/#!/hackarde

Make Your Own Operating System In Some Minutes

6 comments


Hello Friend, Now i am again come with a new interesting topic , today High Quality Post based on Operating System. No No !! i am not going tell you about a new OS. My today post tell you how to make your own Operating System, Plz read again because i think that you think what i said in back line .

You think a g8t knowledge necessary for read forward but i say noop (no) because this OS create by you without any knowledge and totally free. So why wait for Amazing work let's start.


Step 1: First Go to below write website.....

SUSE Studio

When you open this link then a page open like below pic, here click on "Sign In or Create an Account" , see below pic..


 Step 2: When you done step 1 then a window pop up like below pic, where some account given , now click on any account for open which one you have already exist to you , then enter your account Username and Password , do not fear that secure.


Step 3: When you done step 2 then he asking access information of your account then click allow for forward process , if you don't trust so use fake account here.


Step 4: Now Select your OS template , if pic not clear so right click on pic and open image in new tab.


Step 5: When you select the OS then it ask about your OS name, you change name according to you and click on software tab , see below picture...


Step 6: Here select software which you want on your OS, see below pic...


Step 7: now go to Configuration and Select General , here you see at below your Username "Root" and select Password according to you. I select "toor" as default Linux Password , see pic...


Step 8: Now click on Personalize and select your logo and Login window background , you can also upload your own logo and wallpaper, see below pic...


Step 9: Now last work , go to Build and select your OS format , and after that click "Build" , See below pic... 


Step 10: Now your OS start Build and when this Build Complete a download link come then you download you OS under 7 days.


I think you like my new post , plz follow my blog and like my Facebook page for encourage me.

Enjoy your OS!!!!!!!

IP Forwarding - How to make Windows XP as a Router

2 comments


Do you aware that enabling IP forwarding using Windows XP Professional will make it as a simple router, so that you can have 2-3 different networks at home and those computers manage to talk to each other from different network. The router is needed to send/receive the traffic from one network to another network or access Internet. The benefit is you don’t have to buy additional router and so can save some money. This approach is not so common practiced in Windows XP, but it works.
As an example, let say you have 7 computers and 2 network switches, and need to create 2 networks that can access Internet, so how to do it?? Some more information, one of the computers is equipped with 3 network cards and one of the network cards is connected to cable/DSL modem to access Internet, so this computer will act as a router!


Configure the network cards on the router with following information.

Router (Windows XP Professional)

Network Card A (connect to network A):
IP: 10.10.10.1
Netmask: 255.255.255.0
Gateway (GW): [leave it blank]

Network Card B (connect to network B):
IP: 192.168.20.1
Netmask: 255.255.255.0
Gateway (GW): [leave it blank]

Network Card C (connect to Internet via cable/dsl connection)
This information will be based on the Internet connection service which you have subscribed. 
IP: 192.168.1.1
Netmask: 255.255.255.0
Gateway (GW): 192.168.1.1

Configure all the computers in network A with following information.

Network A 
IP: 10.10.10.2-254
Netmask: 255.255.255.0
Gateway (GW): 10.10.10.1

Configure all the computers in network B with following information.

Network B 
IP: 192.168.20.2-254
Netmask: 255.255.255.0
Gateway: 192.168.20.1

Ok.. Now it’s the time to configure IP forwarding on that router…

1) Go to Start and click Run…, then type in regedit to run registry editor.


Note: Please note that only System Administrator can run registry editor.

2) Registry editor window will appear. Browse for the following registry key at the left hand side window:

HKEY_LOCAL_MACHINESYSTEMCurrentControlSetServicesTcpipParameters

Right click IPEnableRouter registry object, and click Modify.

Note: Be extra careful when you deal with registry editor, wrong editing will crash you Windows OS.


3) The IPEnableRouter window will appear. Type 1 as Value data and click OK.


4) Close the regisrty editor and reboot the computer. After rebooting, all the computers should be able to access Internet and also share the file/printer between network A and B.
Note: When I did the test, IP forwarding will only work after rebooting the computer. So don’t forget to do it.


MAC Address Spoofing in BackTrack 5

2 comments


Today, i am going to show you how to change your system MAC address or Hardware Address or Physical Address.

First you know about MAC address.  MAC address is your system physical address which provided by Vendor means manufacture company of your system. We know that IP address is a logical address and Unique in whole world for a system, but this thing does not necessary for MAC address.

If you have IP address of any system then by use of ARP you capable find the MAC address of system and By use of RARP you capable to find out MAC address.

So all above write things is enough for know about MAC address. Now our target is how to change MAC address of system when you use BackTrack 5, so let's start.

Step1: Open your terminal window in BackTrack 5 and for see present MAC address write....

ifconfig

and press enter key, in below pic i have shown the MAC address in RED Box,see pic...


Step2: Your MAC address works on eth0 , so for change the MAC address first keep down eth0, run command...

ifconfig eth0 down


see below pic..


Step3: Now i am going to change MAC address , so change it run command...

macchanger -r eth0

when you run this command then it show you current MAC address and Faked MAC address, see below pic...


Step4: Now your MAC address spoof now again active your internet interface eth0 by run command...

ifconfig eth0 up

see below pic...


Step5: Now again check your MAC address , so for this run command "ifconfig" , see below pic..


See MAC Address in Blue Box which that FAKE MAC address.

How To Install Android Ice Cream Sandwich On Your NoteBook

4 comments

Today I am going to show how you can install Androidx86 latest version of Android Operating System also called ICE CREAM SANDWICH on your NoteBook.

What the profit of  doing it? I think you never want to spend money for buy a new Android based Tablet PC. So now let's start.


Next Work makes Android Download .iso file boot-able so for this use tool  UNetbootin   and your PenDrive .
Enter your PenDrive and make bootable file on it by help of  UNetBootin .Below i am showing view of UNetbootin ,see pic...


When Your PenDrive ready for work then Enter it on your Notebook and  START your Notebook , When your Notebook  boot for OS then Press Key F2 or F8 then a blue screen window open ,here going on Boot Section and and select the Removable Device , see below pic...


When your NoteBook Start booting by Removable Device means by your PenDrive then a screen come like below pic...


Here Select Installation-Install Android-x86 to harddisk , then processing start it take some time.


And after some times your Android based NoteBook start working. Problem comes in Some Application at running  time but it work very well for you


So Enjoy your Android Based NoteBook .

Immediately Hide Your Desktop Work By See Anyother

1 comments


This is my favorite way of hiding things from others, and the great thing is that Virtual Desktop Managers can also be used to actually get some work done. Virtual Desktop Managers are programs that allow you to have multiple desktops within your own desktop, making it easier to work on separate projects.
For example, you could have games on one desktop, blogs on another, and whatever you’re working on on the third desktop. It’s really a handy way of organizing your desktop. The best thing about it is that you can use most Virtual Desktop Managers to hide your active windows from those prying eyes.

For You i m going to making 3 Desktop where 2 virtual and One Real.

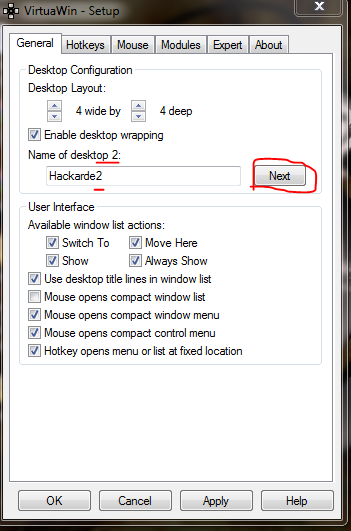
When you open your VDM then it look like below pic,feel up like below pic...


Click "Next" and make new again ....


As well as Hackarde3....


When you click "Apply" and Ok then on desktop left side in bottom you see icon like below pic...


Click Right Key on them and select your Desktop.


Remove Google Redirect Virus from your system

3 comments


If your Google search result redirect to any weird,obnoxious or otherwise any porn site that means your system infected with GRV means Google Redirect Virus.GRV is a Trojen 

It does not matter with which link you click or which browser use by you.

Somebody thought this is the problem of Google but in reality it is add with your system,so in your mind a question come how to remove it.Here i am going tell you how to remove GRV from your system.


First Download TDSKiller ,do not worry it is a Kaspersky Lab Tool and download direct from Kaspersky site.

After download open it,it look like below pic...


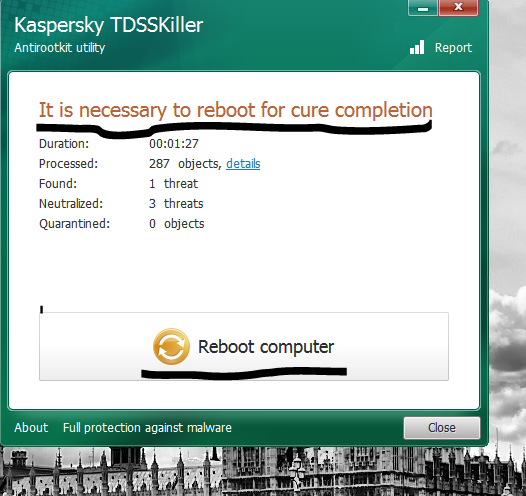
Click on Start Scan and after scan you see result like below pic,Here you found option Skip or Delete for infected program.


After Delete the infected program please Reboot your system.


If your TDS Tool fail in removing the infected file then in that case use the TDS FixTool , you also download this file from www.symantec.com.After download run it,you see box like below pic,Proceed it.


When you Proceed then it restart your system and after that doing scan like below pic...


And last shown the result like below pic....


Make Encrypted Folders Others Can’t View it on your Hard Disk

0 comments


Click the Create Volume button to build that container we were talking about.


When you did it,then you see below pic window click on next.


Click on Standard nd again Next.


Set Volume location by Click on "Select File"...


Make new volume like below pic...


Set Your Encryption Algo like below pic...


Set Volume size,wht u want....


Write volume password...


Set volume format and take a rest...


Message come like below pic...


Volume create click on Exit.


HOW TO USE THIS VOLUME:


Click on Container which you select first time.


click on "SELECT FILE" like below pic...


Open your make volume...


Main work here,click on Mount...


Enter your password..


Your volume open like below pic...


Go and use it..


For again Encrypt and hidden click on "DisMount".


Related Posts Plugin for WordPress, Blogger...

Hackarde's Search Engine- Search Hacking Tutorial,Tool and eBook

Loading
 
HACKARDE © 2011 | Designed by HrDe