If this is the first post of you on BackTrack so i am recommend you first read below post before read this post...
I am given thanks to Mr.Vivek Ramachadran for his composition and amazing work done by which writing this post made very easy and helpful for all viewer. This Post thing taken by Vivek Ramachadran's Book.
Now we will look at how to connect to the access point using the Alfa wireless card. Our access point has an SSID Wireless Lab and does not use any authentication.
Here we go! Follow these steps to connect your wireless card to the access point:
1. Let us first see what wireless networks our Alfa card is currently detecting. Issue the command iwlist wlan0 scanning and you will find a list of networks in your vicinity:
2. Keep scrolling down and you should find the Wireless Lab network in this list. In my setup, it is detected as Cell 05, it may be different in yours. The ESSID field contains the network name:
3. As multiple access points can have the same SSID, verify that the MAC address mentioned in the Address field above matches your access point's MAC. A fast and easy way to get the MAC address is underneath the access point or using the web-based GUI settings.
4. Now, issue the command iwconfig wlan0 essid "Wireless Lab" and then iwconfig wlan0 to check the status. If you have successfully connected to the access point, you should see the MAC address of the access point in the Access Point: field in the output of iwconfig, as shown in the following screenshot:
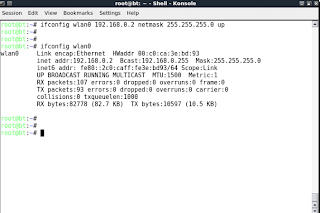
5. We know the access point has a management interface IP address "192.168.0.1" from its manual. Alternatively, this is the same as the default router IP address when we run the route –n command. Let's set our IP address in the same subnet by issuing the command ifconfig wlan0 192.168.0.2 netmask 255.255.255.0 up. Verify the command succeeded by typing ifconfig wlan0 and checking the output:
6. Now let's ping the access point by issuing the command ping 192.168.0.1. If the network connection has been set up properly, then you should see the responses from the access point. You can additionally issue an arp –a to verify that the response is coming from the access point. You should see that the MAC address of the IP 192.168.0.1 is the access point's MAC address we have noted earlier. It is important to note that some of the more recent access points might have response to ICMP Echo Request packets disabled. This is typically done to make the access point secure out-of-the-box with only the bare minimum configuration settings available. In such a case, you could try to launch a browser and access the web interface to verify that the connection is up and running.
7. On the access point, we can verify the connectivity by looking at the connection logs. As you can see in the following log, the MAC address of the wireless card 00:c0:ca:3a:bd:93 has been logged:
We just connected to our access point successfully from BackTrack using our Alfa wireless card as the wireless device. We also learnt how to verify that a connection has been established at both the wireless client and the access point side.