Pages

Use Address Resolution Protocol By BackTrack

3 comments


Now again a good Backtrack tutorial here. I want you read this tutorial carefully because i will used this tutorial on Future post.

Today i am telling you , how you can use  ARP  ( Address Resolution Protocol ) in backtrack. For this object i am going to use ARPING tool of Backtrack 5 R1. First thing here , what is ARP ?

 The Address Resolution Protocol is a request and reply protocol that runs encapsulated by the line protocol. It is communicated within the boundaries of a single network, never routed across internetwork nodes. 

Means if you know IP address of a device then by this you can know MAC (Physical Address) of that device and vice versa .

And what means of Never Routed across internetwork nodes

It's means that Non-Routable  works only on your LAN. by this only you know IP address and MAC address of  device in your LAN ( Local Area Network ) means this work on only Second layer of OSI layer.

For example: If i want to know my website MAC address (All person know never any type of MAC address present for Website ) then open my Backtrack Terminal and run command...

arping -c 4 hackarde.com


Where hackarde.com my website name and here 4 is number of packet which i want to send website means it's any number like 2,3,6,5,.........

But when i am run this command then it shown me "0 packet received out of 4" which means it's not work on internet or inter-network. See below pic... 


Step 1: Now Go to Application >> Backtrack >> Information Gathering >> Network Analysis >> Identify Live Host >> arping  

Now open by click this arping tool , see below pic for full view...


Step 2: When you open arping tool then a new window open like below pic...


Step 3: Now i have Victim IP  192.168.0.7  by my this post.....


Now i want his System MAC address , so run command...

arping -c 4 192.168.0.7


And press Enter Key , when you done it then it's show you this IP address Mount on which MAC address. See below pic...


I am find MAC address of Device which run on my LAN is b8:a3:86:87:79:3d . Now Note out it.

Step 4: Now one day i wake up and want to know about IP address of my victim system and it will not possible use again this thread...


So no problem, only open arping like step 1 and run command with his note MAC address.

arping -c 4 b8:a3:86:87:79:3d

See below pic...


And you found his IP address by MAC address.


Enjoy !!!!!!!!!!!!!!!

Toonel- Fast Internet and Anonymous Surfing

5 comments


After a long period i am again come on Fast internet topic with Anonymous Surfing (Proxy). Today i am telling you about a very nice tool which helpful for you on both above write topic . I think mostly new internet user never hear about it because further development of this multi-platform java-based application has been stopped since 2006.

toonel.net is a proxy server developed to save traffic. If you are paying a fee based on the amount of data you transfer (e.g. 3G/GPRS/DSL/CDMA/Satellite Internet Service) and have monthly download limit, or if you have narrowband connection (e.g. dialup modem) then you are most likely to appreciate the service toonel.net offers. There are number of toonel.net client application packages. All solutions are 100% Java based and therefore this service can be used on any platform with an installed Java Runtime Environment, including mobile phones.


Two profit of Toonel.net:

1. Toonel – for tunnel – does its job by compressing all the data traffic transferred to and from our machine. Smaller data sizes means shorter querying and loading times. This method will result in cheaper billing.

2.  Toonel also re-routes the traffic to a third party proxy server in an unknown location. This method will result in even faster and more secure data traffic.

So how to use Toonel, follow my write steps:

Step1: Go to Mozila Firefox Browser and Open "options" in Mozila, after that under option go to Advanced  and when a Advanced open then go to Settings.
Click on the settings when u done it then a new window pop-up where set Manual Proxy Configuration.

Under Manual Proxy type HTTP Proxy is 127.0.0.1 and Port 8080.

Now Click on Ok and Close Option Window. See below pic for all work and set all thing according to this.


Step 2: Now open your download Toonel.net Tool and Click on Mapping after that select 127.0.0.1 and click on apply , see below pic...


Step 3: Now I am going to Mozila Browser and open my Website www.hackarde.com . When page start loading then go to Toonel.net and Check Compressed Out and In Data by click on Stats , See below pic..


Here you see a lot compression of Data between In to Out and Out to In .

This trick tool old and you never found it anywhere.


Kill TCP Session in Linux

6 comments


Hello friend , after some time i am again come with new thread. In this time, i am busy with my Project so sorry for wait. Today post topic based on killing TCP session in Linux. You can use this trick with any Linux Version OS , here i am use backtrack for showing you.

Step 1: First open your Linux Terminal , now i am going to install "ngrep" application for killing session. For install ngrep run below write command:

sudo apt-get install -y ngrep

see below pic...


Because i have already install it, so it's done fast but your system take sometime.

Step 2: Now i have open my Facebook ID for show you my Facebook TCP Session works good and it's open good and in smooth way...


Step 3: Now i am going to Kill TCP session of Facebook Website , so for kill session run below command.

ngrep -q -d any 'facebook.com' -k 10


See below pic for running command, now your Facebook TCP Session start killing.


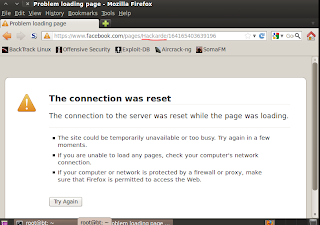
Step 4: For check TCP Session Killing start or not ? , i am going to my FaceBook Profile Page which shown by me in step 2 and then click there Hackarde link , when i done it page start reload and reload end with message "The Connection was reset" which means your Linux Start Killing of Facebook TCP Session, see below pic for example...


Step 5: Now take one more example, here i am open my Site www.hackarde.com , see below pic...


My site open without any problem because i am only Kill FaceBook TCP Session , see below pic..


Step 6: Now i am going to kill my website TCP session by run command,

ngrep -q -d any 'hackarde.com' -k 10


See below pic...


Step 7: Now when i am again open my website then it's show message like old Facebook page, see below pic..


But Now my Facebook Profile again open...


I hope u like my this post, Enjoy!!

IP Forwarding - How to make Windows XP as a Router

2 comments


Do you aware that enabling IP forwarding using Windows XP Professional will make it as a simple router, so that you can have 2-3 different networks at home and those computers manage to talk to each other from different network. The router is needed to send/receive the traffic from one network to another network or access Internet. The benefit is you don’t have to buy additional router and so can save some money. This approach is not so common practiced in Windows XP, but it works.
As an example, let say you have 7 computers and 2 network switches, and need to create 2 networks that can access Internet, so how to do it?? Some more information, one of the computers is equipped with 3 network cards and one of the network cards is connected to cable/DSL modem to access Internet, so this computer will act as a router!


Configure the network cards on the router with following information.

Router (Windows XP Professional)

Network Card A (connect to network A):
IP: 10.10.10.1
Netmask: 255.255.255.0
Gateway (GW): [leave it blank]

Network Card B (connect to network B):
IP: 192.168.20.1
Netmask: 255.255.255.0
Gateway (GW): [leave it blank]

Network Card C (connect to Internet via cable/dsl connection)
This information will be based on the Internet connection service which you have subscribed. 
IP: 192.168.1.1
Netmask: 255.255.255.0
Gateway (GW): 192.168.1.1

Configure all the computers in network A with following information.

Network A 
IP: 10.10.10.2-254
Netmask: 255.255.255.0
Gateway (GW): 10.10.10.1

Configure all the computers in network B with following information.

Network B 
IP: 192.168.20.2-254
Netmask: 255.255.255.0
Gateway: 192.168.20.1

Ok.. Now it’s the time to configure IP forwarding on that router…

1) Go to Start and click Run…, then type in regedit to run registry editor.


Note: Please note that only System Administrator can run registry editor.

2) Registry editor window will appear. Browse for the following registry key at the left hand side window:

HKEY_LOCAL_MACHINESYSTEMCurrentControlSetServicesTcpipParameters

Right click IPEnableRouter registry object, and click Modify.

Note: Be extra careful when you deal with registry editor, wrong editing will crash you Windows OS.


3) The IPEnableRouter window will appear. Type 1 as Value data and click OK.


4) Close the regisrty editor and reboot the computer. After rebooting, all the computers should be able to access Internet and also share the file/printer between network A and B.
Note: When I did the test, IP forwarding will only work after rebooting the computer. So don’t forget to do it.


"Reboot" - Upcoming latest Hacker Movie you should watch

1 comments


Rosa Entertainment and Jan-Ken-Po Pictures just announced that their cyberpunk thriller short film “Reboot” will launch with a Sneak Preview at DEFCON.

Written and Directed by Joe Kawasaki, and Produced by Sidney Sherman, the film stars a bevy of hot up-and-coming actors including Emily Somers (Gabriele Muccino’s upcoming “Playing the Field”), Travis Aaron Wade (“War of the Worlds”), Martin Copping (Australian series “Neighbours”), Sonalii Castillo (“NCIS”), and Janna Bossier (Slipnot’s “Vermilion").

Set within a dystopian world that is a collision between technology and humanity, “Reboot” touches upon many of the current social and political concerns that arise from becoming more and more intertwined with the virtual. In contemporary Los Angeles, a young female hacker (Stat) awakens from unconsciousness to find an iPhone glued to her hand and a mysterious countdown ticking away on the display. Suffering from head trauma and with little recollection of who she is or what is happening, Stat races against time to figure out what the code means and what unknown event the pending zero-hour will bring.


The recent launch of their ARG (Alternate Reality Game) has caught the attention of hackers and cyberpunk fans via Twitter. Basically, some Easter Eggs are hidden in the film trailer for viewers to find. When a player thinks they have found anything, they simply send a direct message to @reboot_film on Twitter for confirmation. As players find things they are awarded points and the Top Ten players will be awarded some cool prizes. For more ARG details, please go to: www.rebootfilm.com/scoreboard. To view the trailer: www.rebootfilm.com/trailer.


The film is the product of a successful Kickstarter campaign and has been building momentum ever since it was first announced on kickstarter.com in August of last year. Kawasaki said, "It (the film) was originally designed to simply be a great little ride, but as real world events keep developing around us (regarding issues of cyber-freedom, online privacy, security, etc.); the connotation of the film evolves and changes with it."

"Reboot" is a co-production of Sherman's production shingle, Rosa Entertainment, and Kawasaki’s Jan-Ken-Po Pictures; and the filmmakers are aiming for international film festivals like Cannes, Locarno and Toronto, as well as distribution via the internet.


Source : THN

Facebook Disconnect

1 comments


Stop Facebook from tracking the webpages you go to.
Facebook is notified whenever you visit one of the more than one million sites on the web that use Facebook Connect and has a history of leaking personally-identifiable information to third parties.

Turn off the flow of your data to them!

Facebook Disconnect blocks all traffic from third-party sites to Facebook servers but still lets you access Facebook itself.


This extension is a must-have! Along with Disconnect and Adblock. When I am setting up someone's computer with Google Chrome, I always install Disconnect, Facebook Disconnect, and Adblock, at the very least.Personally, I use Google Chrome (Beta) and I use Chrome Privacy Guard.Keep your data private folks! The tools are there to keep your browser safe, use them. There is no need to pay for good security anymore.


MAC Address Spoofing in BackTrack 5

2 comments


Today, i am going to show you how to change your system MAC address or Hardware Address or Physical Address.

First you know about MAC address.  MAC address is your system physical address which provided by Vendor means manufacture company of your system. We know that IP address is a logical address and Unique in whole world for a system, but this thing does not necessary for MAC address.

If you have IP address of any system then by use of ARP you capable find the MAC address of system and By use of RARP you capable to find out MAC address.

So all above write things is enough for know about MAC address. Now our target is how to change MAC address of system when you use BackTrack 5, so let's start.

Step1: Open your terminal window in BackTrack 5 and for see present MAC address write....

ifconfig

and press enter key, in below pic i have shown the MAC address in RED Box,see pic...


Step2: Your MAC address works on eth0 , so for change the MAC address first keep down eth0, run command...

ifconfig eth0 down


see below pic..


Step3: Now i am going to change MAC address , so change it run command...

macchanger -r eth0

when you run this command then it show you current MAC address and Faked MAC address, see below pic...


Step4: Now your MAC address spoof now again active your internet interface eth0 by run command...

ifconfig eth0 up

see below pic...


Step5: Now again check your MAC address , so for this run command "ifconfig" , see below pic..


See MAC Address in Blue Box which that FAKE MAC address.

Crack MD5 Hashes

6 comments


Today i am going to show you a tool by which you easily decrypt the MD5 Encrypted Hashes. The name of the tool is PasswordPro.


This is a Winrar file so after download extract it when u going under the PasswordPro folder,there you see a PasswordPro.exe file ,run this file.After run this open your Notepad and write your MD5 Hash Code which you want to decrypt and save it on same folder of PasswordPro or any where,see below pic...


Now go to PasswordPro Running program and click on File when you do it then a tab open where you see a option given which called "Import" , see below pic...


Now select your save Notepad copy from the saving place.


when you did it then a window of Import Users open where select type of Hash which type of hash you use and enter format is salt. see below pic...


Now go to "Audit" and select the type of attacks, "Preliminary attacks" default set but here for my hash i am select "Brute Force attacks" , see below pic..


Now go to "Start Attacks" see above pic and run it, when your process run then it look like below pic...


Wait for some time your result come after full process.

[Video Tutorial] Setup your own web hacking lab

3 comments


My Today Video tutorial based on my old post


I am made this video for viewer help whose that want to setup his own Web hacking Lab.


[Video Tutorial]How To Setup Two Factor Authentication in Backtrack Linux

0 comments


This time on the show Darren reports from SXSW 2012 with Eighty of Dual Core and Chris Mooney of DoD.net. The boys discuss two-factor authentication on the Linux platform then brainstorm and develop a tool, dubbed "Kill All The Humans", to protect your machine from unwanted invaders. Invaders must die.


PART 1


PART 2


PART 3


Related Posts Plugin for WordPress, Blogger...

Hackarde's Search Engine- Search Hacking Tutorial,Tool and eBook

Loading
 
HACKARDE © 2011 | Designed by HrDe